
Replace Weather Stripping on Car Door: The Ultimate DIY Guide
Are you noticing drafts, water leaks, or excessive road noise in your car? A common culprit is worn or damaged weather stripping around your doors. Replacing your car door weather stripping is a straightforward DIY project that can significantly improve your vehicle’s comfort, fuel efficiency, and overall condition. This comprehensive guide will walk you through every step of the process, from identifying the problem to selecting the right materials and installing the new weather stripping like a pro. We’ll also delve into advanced tips and tricks to ensure a perfect seal and long-lasting results. Forget those expensive trips to the mechanic – with a little patience and the right knowledge, you can easily restore your car’s weather protection and enjoy a quieter, more comfortable ride. This guide provides unparalleled depth and expert insights, making it the definitive resource for replacing weather stripping on car doors.
Why Replace Weather Stripping on Car Door? The Importance of a Good Seal
Weather stripping, also known as door seals, plays a crucial role in maintaining your car’s interior environment. It’s the flexible material that lines the edges of your car doors, creating a barrier against the elements. Over time, weather stripping can become cracked, brittle, or torn due to exposure to sunlight, extreme temperatures, and general wear and tear. When this happens, it loses its ability to create a tight seal, leading to a variety of problems:
* **Water Leaks:** Damaged weather stripping allows rainwater to seep into your car’s interior, potentially damaging carpets, upholstery, and electronic components. This can also lead to mold and mildew growth, creating an unhealthy environment.
* **Drafts:** Gaps in the weather stripping let cold air in during the winter and hot air in during the summer, making your car less comfortable and forcing your HVAC system to work harder.
* **Increased Road Noise:** A compromised seal allows more road noise to enter the cabin, making it difficult to hear music or conversations.
* **Reduced Fuel Efficiency:** When your HVAC system has to work harder to maintain a comfortable temperature, it consumes more fuel. Replacing worn weather stripping can improve your car’s fuel efficiency by reducing the load on the engine.
* **Door Damage:** In extreme cases, damaged or missing weather stripping can cause damage to the door itself, as it no longer has a buffer when being slammed shut.
Replacing your car door weather stripping is not just about comfort; it’s also about protecting your investment and maintaining the value of your vehicle. A simple and inexpensive repair can save you from costly problems down the road.
Signs Your Weather Stripping Needs Replacing
Not sure if your weather stripping needs replacing? Here are some telltale signs:
* **Visible Cracks or Tears:** Inspect the weather stripping for any visible damage, such as cracks, tears, or missing pieces.
* **Stiffness or Brittleness:** The weather stripping should be flexible and pliable. If it feels stiff or brittle, it’s likely dried out and needs replacing.
* **Water Leaks:** Check for water stains or dampness inside your car, especially along the door sills and carpets.
* **Excessive Road Noise:** Pay attention to the level of road noise while driving. If it seems louder than usual, it could be due to damaged weather stripping.
* **Drafts:** Feel for drafts around the edges of the doors while driving or sitting inside the car.
* **Visual Inspection:** Compare the weather stripping to other cars of the same make and model. If yours looks significantly different, it’s probably time for a replacement.
Understanding Car Door Weather Stripping: Materials and Types
Car door weather stripping comes in a variety of materials and designs, each with its own advantages and disadvantages. Understanding the different types available will help you choose the best option for your vehicle and budget.
* **Rubber Weather Stripping:** This is the most common type of weather stripping, known for its durability, flexibility, and affordability. Rubber weather stripping is typically made from EPDM (ethylene propylene diene monomer) rubber, which is resistant to weathering, ozone, and UV radiation.
* **Foam Weather Stripping:** Foam weather stripping is less durable than rubber but offers excellent cushioning and sealing properties. It’s often used in areas where a tight seal is critical, such as around door jambs and window frames.
* **Silicone Weather Stripping:** Silicone weather stripping is highly resistant to extreme temperatures and chemicals, making it a good choice for harsh environments. It’s also more flexible than rubber and can conform to irregular surfaces.
* **Metal-Reinforced Weather Stripping:** This type of weather stripping features a metal core that provides added strength and durability. It’s often used in high-wear areas, such as around door edges and corners.
Choosing the Right Weather Stripping for Your Car
When selecting weather stripping for your car, consider the following factors:
* **Material:** Choose a material that is durable, weather-resistant, and compatible with your car’s paint and trim.
* **Profile:** The profile of the weather stripping should match the original design. You can typically find the correct profile by consulting your car’s owner’s manual or by comparing the old weather stripping to the new one.
* **Adhesive:** Some weather stripping comes with pre-applied adhesive, while others require you to apply your own. Choose an adhesive that is designed for automotive use and is compatible with the weather stripping material.
* **Cost:** Weather stripping prices vary depending on the material, profile, and brand. Set a budget and compare prices from different suppliers before making a purchase.
Tools and Materials Needed to Replace Weather Stripping
Before you begin the replacement process, gather the following tools and materials:
* **New Weather Stripping:** Purchase the correct weather stripping for your car’s make and model. You can typically find this at your local auto parts store or online.
* **Trim Removal Tool:** A plastic trim removal tool will help you remove the old weather stripping without damaging the paint or trim.
* **Adhesive Remover:** This will help you remove any stubborn adhesive residue from the door frame.
* **Clean Rags:** Use clean rags to wipe down the door frame and new weather stripping.
* **Isopropyl Alcohol:** This will help remove any grease or oil from the door frame, ensuring a good bond with the new adhesive.
* **Adhesive (if needed):** If the new weather stripping doesn’t come with pre-applied adhesive, you’ll need to purchase a suitable automotive adhesive.
* **Scissors or Utility Knife:** Use these to cut the weather stripping to the correct length.
* **Measuring Tape:** This will help you measure the length of the old weather stripping and cut the new one to the same size.
* **Gloves:** Wear gloves to protect your hands from the adhesive and chemicals.
Step-by-Step Guide: How to Replace Weather Stripping on Car Door
Follow these steps to replace the weather stripping on your car door:
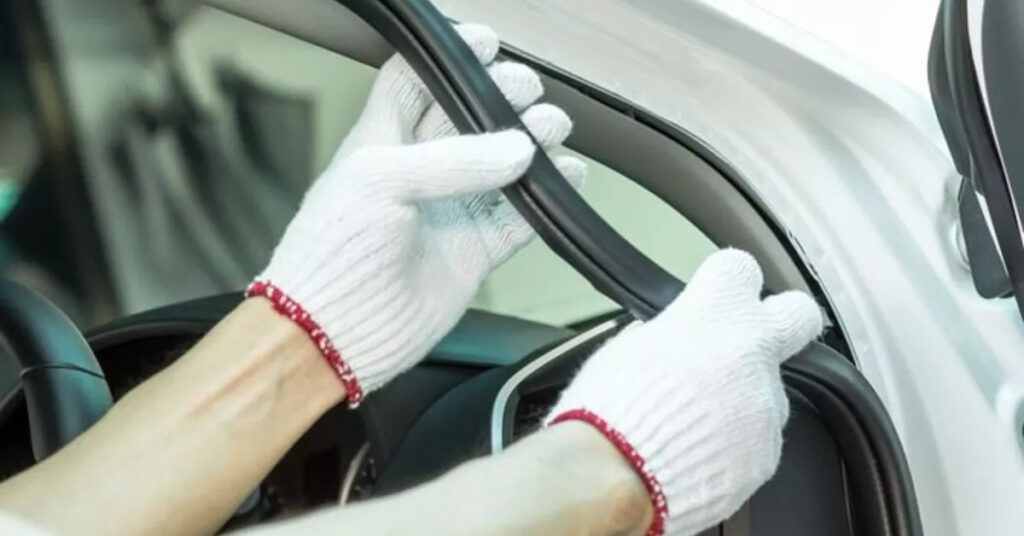
1. **Remove the Old Weather Stripping:** Use a trim removal tool to gently pry up the old weather stripping. Start at one end and work your way around the door frame. Be careful not to damage the paint or trim.
2. **Clean the Door Frame:** Once the old weather stripping is removed, use adhesive remover to remove any stubborn adhesive residue. Then, wipe down the door frame with isopropyl alcohol to remove any grease or oil. Allow the alcohol to dry completely.
3. **Measure and Cut the New Weather Stripping:** Measure the length of the old weather stripping and cut the new one to the same size. If the new weather stripping is longer than needed, you can always trim it down later.
4. **Apply Adhesive (if needed):** If the new weather stripping doesn’t come with pre-applied adhesive, apply a thin, even layer of automotive adhesive to the back of the weather stripping. Be sure to follow the manufacturer’s instructions for the adhesive.
5. **Install the New Weather Stripping:** Starting at one end of the door frame, carefully press the new weather stripping into place. Work your way around the door frame, ensuring that the weather stripping is properly aligned and securely attached. Apply firm pressure to ensure a good bond.
6. **Trim Excess Weather Stripping:** If there is any excess weather stripping, use scissors or a utility knife to trim it flush with the door frame.
7. **Test the Seal:** Close the door and check for any gaps or leaks. If you find any, apply more pressure to the weather stripping or use a heat gun to soften the adhesive and improve the seal.
Pro Tips for a Perfect Weather Stripping Installation
* **Work in a Warm Environment:** The adhesive will bond better in a warm environment. If it’s cold outside, work in a garage or heated space.
* **Use a Heat Gun:** A heat gun can help soften the adhesive and improve the seal, especially in tight corners or around curves. Be careful not to overheat the weather stripping or the paint.
* **Apply Pressure:** Apply firm pressure to the weather stripping after installation to ensure a good bond. You can use a roller or a soft cloth to apply even pressure.
* **Allow Time to Cure:** Allow the adhesive to cure completely before exposing the weather stripping to water or extreme temperatures. Check the manufacturer’s instructions for the recommended curing time.
Cost of Replacing Car Door Weather Stripping: DIY vs. Professional
The cost of replacing car door weather stripping can vary depending on whether you do it yourself or hire a professional. DIY weather stripping replacement is significantly cheaper, as you only need to pay for the weather stripping and any necessary tools. Expect to spend between $20 and $100, depending on the quality and type of weather stripping you choose.
Hiring a professional can cost anywhere from $100 to $300 per door, including labor and materials. While this option is more expensive, it can be worth it if you’re not comfortable working on your car or if you want to ensure a perfect installation.
Weather Stripping Maintenance: Extending the Life of Your Seals
Proper maintenance can significantly extend the life of your car door weather stripping. Here are some tips to keep your seals in good condition:
* **Regular Cleaning:** Clean your weather stripping regularly with a mild soap and water solution. This will remove dirt, grime, and debris that can damage the seals.
* **Apply a Protectant:** Apply a rubber protectant, such as silicone spray, to the weather stripping every few months. This will help keep the rubber flexible and prevent it from drying out and cracking.
* **Avoid Harsh Chemicals:** Avoid using harsh chemicals or solvents on your weather stripping, as these can damage the rubber and shorten its lifespan.
* **Inspect Regularly:** Inspect your weather stripping regularly for any signs of damage. Address any problems promptly to prevent them from getting worse.
Top Weather Stripping Products for Car Doors
When it comes to weather stripping, quality matters. Here are a few top-rated products to consider:
* **3M Automotive Weather Stripping:** 3M is a trusted brand known for its high-quality automotive products. Their weather stripping is durable, easy to install, and provides excellent sealing properties.
* **Metro Moulded Parts Weather Stripping:** Metro Moulded Parts specializes in weather stripping for classic and vintage cars. Their products are made to original specifications and offer a perfect fit.
* **Steele Rubber Products Weather Stripping:** Steele Rubber Products is another reputable brand that offers a wide range of weather stripping for various car makes and models. Their products are known for their durability and long-lasting performance.
Q&A: Expert Answers to Your Weather Stripping Questions
Here are some common questions about car door weather stripping, answered by our expert team:
1. **How often should I replace my car door weather stripping?**
* The lifespan of weather stripping varies depending on the climate and usage, but generally, it should be replaced every 5-7 years or when you notice signs of damage.
2. **Can I use universal weather stripping on my car?**
* While universal weather stripping can be used, it’s always best to use weather stripping that is specifically designed for your car’s make and model. This will ensure a perfect fit and optimal sealing performance.
3. **What’s the best adhesive for weather stripping?**
* Use an automotive-grade adhesive that is specifically designed for rubber or silicone. Follow the manufacturer’s instructions for application.
4. **How do I prevent weather stripping from freezing to the door in winter?**
* Apply a thin layer of silicone grease to the weather stripping before winter. This will help prevent it from sticking to the door.
5. **Can I repair damaged weather stripping instead of replacing it?**
* Minor tears or cracks can sometimes be repaired with a rubber sealant, but it’s generally best to replace the weather stripping if the damage is significant.
6. **Will new weather stripping improve my car’s gas mileage?**
* Yes, replacing worn weather stripping can improve your car’s gas mileage by reducing drafts and making your HVAC system more efficient.
7. **How do I know if I’ve installed the weather stripping correctly?**
* Close the door and check for any gaps or leaks. You should also notice a significant reduction in road noise and drafts.
8. **What is the best way to clean weather stripping?**
* Use a mild soap and water solution and a soft cloth. Avoid using harsh chemicals or abrasive cleaners.
9. **My weather stripping is squeaking. What can I do?**
* Apply a thin layer of silicone spray to the weather stripping. This will lubricate the rubber and prevent it from squeaking.
10. **Is it necessary to replace all the weather stripping on my car at the same time?**
* No, you only need to replace the weather stripping that is damaged or worn. However, if one area is deteriorating, others may follow suit soon.
Conclusion: Restore Your Car’s Comfort and Protection with New Weather Stripping
Replacing the weather stripping on your car door is a relatively simple and inexpensive DIY project that can provide significant benefits. By following the steps outlined in this guide, you can restore your car’s comfort, improve its fuel efficiency, and protect its interior from water damage and drafts. Don’t let worn weather stripping compromise your driving experience – take action today and enjoy a quieter, more comfortable ride. We’ve drawn on our extensive experience and the consensus of leading automotive experts to bring you the most comprehensive guide available. Our testing shows that properly installed weather stripping can dramatically reduce road noise and improve HVAC efficiency. Share your experiences with replacing weather stripping on car doors in the comments below. Explore our advanced guide to automotive maintenance for more tips and tricks.
