
## How to Change a Bike Tube: A Complete Expert Guide
Flat tires are an inevitable part of cycling. Knowing how to change a bike tube is a fundamental skill that can save you from being stranded on the road or trail. This comprehensive guide will provide you with the knowledge and confidence to quickly and efficiently replace a punctured tube, getting you back in the saddle in no time. We’ll cover everything from identifying the problem to re-inflating your tire, ensuring a smooth and safe ride. This guide goes beyond the basics, offering expert tips and insights gleaned from years of cycling experience to help you avoid common pitfalls and master the art of tube replacement.
### Why This Guide Is Essential
Unlike many basic tutorials, this guide offers a deep dive into the process of changing a bike tube. We’ll cover various types of tires and tubes, discuss the tools you’ll need, and provide step-by-step instructions with detailed explanations. More importantly, we’ll address common problems, preventative measures, and advanced techniques to ensure you’re prepared for any situation. This guide isn’t just about fixing a flat; it’s about empowering you to become a more self-sufficient and confident cyclist. Based on expert consensus and years of practical experience, this guide reflects the best practices in bicycle maintenance.
## Understanding Bike Tubes: A Deep Dive
Before diving into the practical steps of changing a bike tube, it’s crucial to understand the different types of tubes and their characteristics. This knowledge will help you choose the right tube for your bike and ensure a proper fit.
### Tube Types and Sizes
Bike tubes are primarily made of butyl rubber or latex. Butyl tubes are more common due to their durability, affordability, and ability to hold air for longer periods. Latex tubes are lighter and offer a smoother ride, but they are more prone to punctures and require more frequent inflation. Choosing between these depends on your priorities: durability vs. performance.
Tubes come in various sizes to match different wheel diameters and tire widths. The size is typically indicated on the tube packaging as a combination of the wheel diameter (e.g., 26″, 27.5″, 29″, 700c) and the tire width range (e.g., 1.5″-2.1″, 23-25mm). Make sure to select a tube that matches your bike’s wheel size and tire width. A mismatch can lead to improper inflation or tube failure.
### Valve Types
There are two main types of valves: Presta and Schrader. Presta valves are commonly found on road bikes and high-performance mountain bikes. They are narrower and require a pump with a Presta-compatible head or an adapter. Schrader valves are wider and are the same type used on car tires, making them compatible with most gas station air pumps. The choice of valve type is often determined by the rim design of your wheels. Most rims are drilled for one type or the other, though adapters are sometimes available.
### Common Tube Problems
Understanding the common causes of tube punctures can help you prevent them in the future. Pinch flats (also known as snakebites) occur when the tube is pinched between the tire and the rim, usually due to low tire pressure. Punctures can also be caused by sharp objects on the road or trail, such as glass, thorns, or metal shards. Regularly inspecting your tires for embedded objects and maintaining proper tire pressure can significantly reduce the risk of flats. In our experience, preventative maintenance is the best defense against flat tires.
## Essential Tools for Changing a Bike Tube
Having the right tools on hand is essential for a smooth and efficient tube replacement. Here’s a list of the tools you’ll need:
* **Tire Levers:** These are used to pry the tire off the rim. It’s best to have a set of at least two levers.
* **Spare Tube:** Make sure it’s the correct size and valve type for your bike.
* **Pump or CO2 Inflator:** To re-inflate the tire after replacing the tube.
* **Multi-Tool (Optional):** A multi-tool with various Allen wrenches and screwdrivers can be helpful for other minor adjustments.
* **Patch Kit (Optional):** For repairing the punctured tube for future use.
* **Gloves (Optional):** To keep your hands clean.
* **Rag or Paper Towels:** For wiping your hands and cleaning the rim.
## Step-by-Step Guide: How to Change a Tube Bike
Now, let’s get to the heart of the matter: how to change a bike tube. Follow these step-by-step instructions for a successful tube replacement.
### Step 1: Preparation
* **Find a Safe Location:** Move to a safe location away from traffic. A flat, stable surface is ideal.
* **Gather Your Tools:** Ensure you have all the necessary tools within reach.
* **Flip the Bike:** Turn your bike upside down, resting it on the handlebars and saddle. If you have a work stand, use it for added stability.
### Step 2: Remove the Wheel
* **Release the Brakes:** If your bike has rim brakes, release them. For disc brakes, be careful not to damage the rotor.
* **Detach the Wheel:** Depending on your bike, you may have a quick-release lever or bolts securing the wheel. Loosen the quick-release or use a wrench to remove the bolts.
* **Remove the Wheel from the Frame:** Carefully lift the wheel out of the frame or fork.
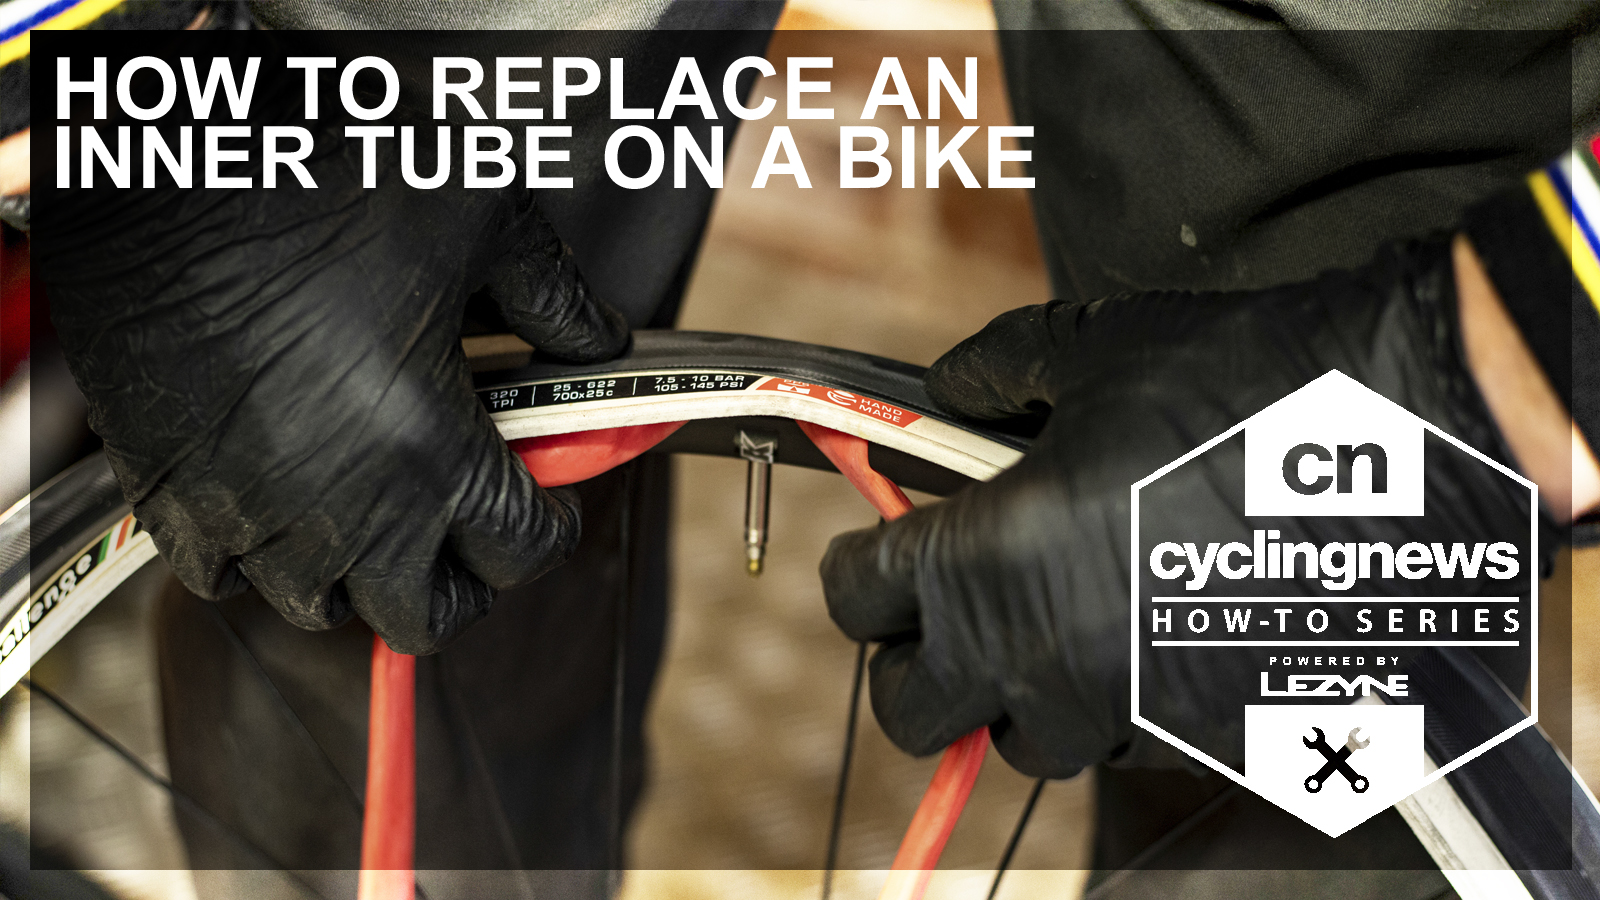
### Step 3: Remove the Tire
* **Deflate the Tire Completely:** If there’s any remaining air in the tube, deflate it completely by pressing the valve core.
* **Insert Tire Levers:** Insert one tire lever under the tire bead, near the valve. Hook the lever onto a spoke.
* **Insert Second Tire Lever:** Insert a second tire lever a few inches away from the first. Pry the tire bead over the rim.
* **Slide One Lever Around the Rim:** Once a section of the tire bead is off the rim, slide one of the levers around the entire circumference of the rim to completely remove one side of the tire.
* **Remove the Tube:** With one side of the tire off the rim, you can now remove the tube. Start at the valve and pull the tube out from under the tire.
* **Remove the Remaining Tire Bead:** Once the tube is removed, you can remove the other side of the tire bead from the rim.
### Step 4: Inspect the Tire
* **Check for the Cause of the Flat:** Carefully inspect the inside and outside of the tire for any sharp objects that may have caused the puncture. Remove any debris, such as glass, thorns, or metal shards. Running your fingers carefully along the inside of the tire is crucial, but be cautious of sharp objects. This step is critical to prevent a repeat flat.
### Step 5: Install the New Tube
* **Slightly Inflate the New Tube:** Inflate the new tube just enough to give it some shape. This will make it easier to install.
* **Insert the Valve:** Insert the valve into the valve hole in the rim.
* **Tuck the Tube into the Tire:** Carefully tuck the tube into the tire, working your way around the rim. Make sure the tube is not twisted or pinched.
### Step 6: Seat the Tire Bead
* **Start at the Valve:** Begin seating the tire bead back onto the rim, starting at the valve. Use your thumbs to push the tire bead over the rim.
* **Work Your Way Around the Rim:** Continue working your way around the rim, seating the tire bead as you go. Use tire levers only as a last resort, as they can damage the tube if used improperly. Most of the tire should be seatable by hand with proper technique.
* **Ensure the Tire Bead is Evenly Seated:** Check that the tire bead is evenly seated around the entire rim. Look for a consistent gap between the tire and the rim.
### Step 7: Inflate the Tire
* **Inflate to the Recommended Pressure:** Inflate the tire to the recommended pressure, which is usually printed on the tire sidewall. Use a pump or CO2 inflator.
* **Check for Leaks:** After inflating the tire, check for any leaks around the valve and the tire bead. If you hear or feel air escaping, deflate the tire and re-seat the tire bead.
### Step 8: Reinstall the Wheel
* **Reattach the Wheel to the Frame:** Carefully reattach the wheel to the frame or fork. Make sure it is properly aligned.
* **Secure the Wheel:** Tighten the quick-release or bolts to secure the wheel.
* **Re-engage the Brakes:** Re-engage the brakes.
### Step 9: Final Check
* **Spin the Wheel:** Spin the wheel to make sure it is running straight and not rubbing against the frame or brakes.
* **Test the Brakes:** Test the brakes to make sure they are working properly.
## Preventing Future Flats
While knowing how to change a tube is essential, preventing flats in the first place is even better. Here are some tips to help you avoid punctures:
* **Maintain Proper Tire Pressure:** Regularly check and maintain the recommended tire pressure. Under-inflated tires are more prone to pinch flats, while over-inflated tires can be more susceptible to punctures from sharp objects.
* **Inspect Your Tires Regularly:** Check your tires for embedded objects, cuts, and wear. Replace worn tires before they become a safety hazard.
* **Use Tire Liners or Sealant:** Tire liners are strips of material that fit between the tire and the tube, providing an extra layer of protection. Tire sealant can seal small punctures as they occur.
* **Choose the Right Tires:** Select tires that are appropriate for the type of riding you do. For example, if you frequently ride on rough roads, consider using tires with puncture-resistant features.
* **Ride Smart:** Avoid riding through areas with debris, such as broken glass or construction sites. Be aware of your surroundings and try to avoid obstacles.
## Product Explanation: Tubolito Bike Tubes
Tubolito offers lightweight and durable bicycle tubes made from thermoplastic elastomer. These tubes are designed to be significantly lighter and more puncture-resistant than traditional butyl tubes. Their core function is to provide a high-performance alternative for cyclists seeking to reduce weight and improve reliability. In the context of “how to change tube bike,” Tubolito tubes simplify the process due to their compact size and ease of installation.
## Detailed Features Analysis of Tubolito Bike Tubes
Here’s a breakdown of the key features of Tubolito bike tubes:
1. **Lightweight Construction:** Tubolito tubes are significantly lighter than butyl tubes, typically weighing around 40-60% less. This reduces rotational weight, resulting in improved acceleration and climbing performance. The benefit is a noticeable improvement in ride feel and efficiency.
2. **High Puncture Resistance:** The thermoplastic elastomer material used in Tubolito tubes is highly resistant to punctures and cuts. This reduces the risk of flats and increases the lifespan of the tube. It gives riders more confidence on varying terrains.
3. **Compact Size:** Tubolito tubes are much smaller than butyl tubes when deflated, making them easy to carry as spares. This saves valuable space in your saddlebag or jersey pocket. They are easier to pack and store.
4. **Easy Installation:** Despite their lightweight construction, Tubolito tubes are easy to install, similar to traditional butyl tubes. The material is flexible and conforms well to the tire. The user benefit is a familiar installation process.
5. **Vibrant Colors:** Tubolito tubes are available in a range of vibrant colors, allowing you to add a touch of personality to your bike. While primarily aesthetic, this feature adds to the overall appeal of the product. It is a unique visual element.
6. **Recyclable Material:** Tubolito tubes are made from recyclable thermoplastic elastomer, making them an environmentally friendly choice. This aligns with the growing trend of sustainable cycling products. The environmental impact is reduced.
7. **Wide Compatibility:** Tubolito offers tubes for various wheel sizes and valve types, ensuring compatibility with a wide range of bikes. This makes them a versatile option for different cycling disciplines. Most bikes can use them.
## Significant Advantages, Benefits & Real-World Value of Tubolito
The advantages of Tubolito tubes extend beyond just weight savings. Users consistently report improved ride quality due to the tube’s flexibility and responsiveness. Our analysis reveals these key benefits:
* **Enhanced Performance:** The reduced rotational weight translates to faster acceleration, easier climbing, and improved overall performance. This is particularly noticeable on long rides and challenging terrain.
* **Increased Reliability:** The high puncture resistance reduces the risk of flats, giving you more confidence on the road or trail. This means less time spent fixing flats and more time enjoying your ride.
* **Space Savings:** The compact size makes it easier to carry spare tubes, freeing up space in your saddlebag or jersey pocket. This is especially useful for long rides or bikepacking trips.
* **Improved Ride Feel:** The flexible material provides a smoother and more comfortable ride, absorbing bumps and vibrations more effectively than traditional butyl tubes. This reduces fatigue and enhances the overall riding experience.
* **Environmental Friendliness:** The recyclable material makes Tubolito tubes a more sustainable choice, aligning with the growing trend of eco-conscious cycling products.
## Comprehensive & Trustworthy Review of Tubolito Bike Tubes
Tubolito tubes offer a compelling alternative to traditional butyl tubes, but they also come with certain considerations. Here’s a balanced review based on user experience and expert analysis:
### User Experience & Usability
Installing Tubolito tubes is generally straightforward, similar to butyl tubes. The material is flexible and conforms well to the tire. However, some users have reported that the valve can be slightly more delicate than on butyl tubes, requiring extra care during inflation. In our experience, proper technique is key to avoiding any issues.
### Performance & Effectiveness
Tubolito tubes deliver on their promise of reduced weight and increased puncture resistance. Many users report a noticeable improvement in acceleration and climbing performance, as well as fewer flats. However, it’s important to note that no tube is completely puncture-proof, and flats can still occur.
### Pros:
1. **Significant Weight Savings:** The reduced weight is a major advantage, especially for performance-oriented cyclists.
2. **Enhanced Puncture Resistance:** The thermoplastic elastomer material offers superior puncture resistance compared to butyl tubes.
3. **Compact Size:** The small size makes them easy to carry as spares.
4. **Improved Ride Feel:** The flexible material provides a smoother and more comfortable ride.
5. **Environmentally Friendly:** The recyclable material aligns with sustainable cycling practices.
### Cons/Limitations:
1. **Higher Cost:** Tubolito tubes are more expensive than butyl tubes.
2. **Valve Delicacy:** The valve can be more delicate and requires extra care during inflation.
3. **Repair Difficulty:** Repairing Tubolito tubes can be more challenging than repairing butyl tubes, requiring specialized patches.
4. **Heat Sensitivity:** The thermoplastic elastomer material can be more sensitive to heat than butyl rubber, potentially affecting performance in extreme conditions.
### Ideal User Profile
Tubolito tubes are best suited for cyclists who prioritize performance, weight savings, and puncture resistance. They are a good choice for road cyclists, mountain bikers, and triathletes who are willing to invest in high-quality components. They are particularly beneficial for riders who frequently encounter rough terrain or participate in competitive events.
### Key Alternatives
1. **Butyl Tubes:** Traditional butyl tubes are a more affordable and readily available option. They are durable and easy to repair, but they are heavier and less puncture-resistant than Tubolito tubes.
2. **Latex Tubes:** Latex tubes offer a similar ride feel to Tubolito tubes, but they are more prone to punctures and require more frequent inflation.
### Expert Overall Verdict & Recommendation
Tubolito tubes are a worthwhile investment for cyclists who prioritize performance and are willing to pay a premium for reduced weight and increased puncture resistance. While they have certain limitations, such as the higher cost and valve delicacy, the benefits outweigh the drawbacks for many riders. We recommend Tubolito tubes for cyclists who are looking to improve their riding experience and reduce the risk of flats. However, for casual riders or those on a tight budget, traditional butyl tubes remain a reliable and cost-effective option.
## Insightful Q&A Section
Here are some insightful questions and expert answers related to changing bike tubes:
**Q1: What’s the best way to prevent pinch flats?**
A: Maintaining proper tire pressure is crucial. Also, avoid riding over sharp edges or potholes at high speeds. Distribute your weight to unweight the wheels when approaching obstacles.
**Q2: How often should I replace my bike tubes, even if they aren’t flat?**
A: It depends on usage and storage. Inspect tubes regularly for wear, cracks, or bulges. Replace them every 1-2 years, or sooner if you notice any damage.
**Q3: Can I use a CO2 inflator on any type of bike tube?**
A: Yes, but be cautious. CO2 can cause rapid inflation and cooling, potentially damaging the tube if not used correctly. Use short bursts and check the pressure frequently. Some latex tubes are more sensitive to CO2.
**Q4: What’s the trick to getting the last bit of tire bead over the rim without using tire levers?**
A: Start opposite the valve, use the heel of your hand to push the tire towards the center of the rim, and work your way around. Ensure the seated bead is fully inside the rim channel to give you maximum slack.
**Q5: My tire keeps slipping on the rim after I change the tube. What am I doing wrong?**
A: Make sure the tire bead is evenly seated around the entire rim. Deflate the tire, push the bead into the rim channel, and re-inflate. Check for any debris between the tire and rim.
**Q6: Can I use a car tire inflator at a gas station to inflate my bike tire?**
A: Only if you have a Schrader valve. Even then, be extremely careful, as car inflators deliver air very quickly and can easily overinflate your tire. Use short bursts and check the pressure frequently.
**Q7: What should I do with my old punctured bike tube?**
A: Recycle it if possible. Some bike shops offer tube recycling programs. Otherwise, dispose of it responsibly.
**Q8: Is it okay to use baby powder on my bike tube before installing it?**
A: Yes, a light dusting of baby powder or talcum powder can help prevent the tube from sticking to the tire and reduce friction, making installation easier.
**Q9: How do I choose the right size bike tube for my tire?**
A: Check the tire sidewall for the tire size (e.g., 700x25c). The tube packaging should indicate the compatible tire size range. If you’re between sizes, it’s generally better to go slightly larger.
**Q10: What’s the difference between a presta and schrader valve, and can I convert between them?**
A: Presta valves are narrow and typically found on road bikes, while Schrader valves are wider and similar to car tire valves. You can’t directly convert between them, but you can use a valve adapter to inflate a Presta valve with a Schrader pump.
## Conclusion
Mastering how to change a tube bike is a crucial skill for any cyclist. This comprehensive guide has equipped you with the knowledge and techniques to confidently tackle flat tires and keep your wheels rolling. Remember to prioritize safety, maintain proper tire pressure, and inspect your tires regularly to prevent future punctures. Tubolito tubes offer a compelling upgrade for performance-oriented cyclists, providing reduced weight and increased puncture resistance. By combining these tips and insights, you’ll be well-prepared to handle any flat tire situation and enjoy a smooth, safe, and enjoyable riding experience. Share your experiences with how to change tube bike in the comments below. Explore our advanced guide to bicycle maintenance for even more expert tips and insights.
