Easy Henna Tattoo: Your Ultimate Guide to Stunning Temporary Art
Looking to adorn your skin with beautiful, intricate designs without the commitment of a permanent tattoo? An easy henna tattoo is the perfect solution! This comprehensive guide will walk you through everything you need to know, from understanding the art of henna to creating your own stunning temporary masterpieces. We’ll explore the history, techniques, safety precautions, and creative possibilities, empowering you to confidently create easy henna tattoo designs at home. This isn’t just another tutorial; it’s your complete resource for mastering the art of easy henna tattoo, ensuring a safe, enjoyable, and artistic experience.
Understanding the Art of Henna: A Deep Dive
Henna, also known as mehndi, has a rich history spanning thousands of years and originating in ancient civilizations. It’s much more than just a temporary tattoo; it’s a cultural art form deeply intertwined with traditions, celebrations, and spiritual practices. Originally used for its cooling properties in hot climates, henna soon evolved into a form of body art, adorning hands and feet for weddings, festivals, and other significant occasions.
The core of henna art lies in the henna plant (Lawsonia inermis). The leaves of this plant contain a dye molecule called lawsone, which binds to the protein in skin, resulting in a temporary stain. The color of the stain can range from orange to deep reddish-brown, depending on factors like skin type, henna paste quality, and application time. Understanding these nuances is crucial for achieving the desired results with your easy henna tattoo.
Recent archaeological findings suggest henna use dates back as far as the Bronze Age. Its significance varies across cultures, with unique styles and motifs specific to different regions. For instance, intricate floral patterns are common in Indian mehndi, while geometric designs are prevalent in Middle Eastern henna art. Appreciating this cultural diversity adds depth to your own henna journey.
Differentiating Natural Henna from “Black Henna”
A critical aspect of easy henna tattoo is understanding the difference between natural henna and so-called “black henna.” Natural henna, derived solely from the henna plant, is safe for skin when used correctly. “Black henna,” on the other hand, often contains a chemical dye called paraphenylenediamine (PPD), which can cause severe allergic reactions, scarring, and permanent skin damage. Always insist on natural henna for your easy henna tattoo to ensure your safety and well-being. Reputable artists will always use and advocate for natural henna.
Choosing the Right Henna Paste for Easy Application
The quality of your henna paste is paramount to achieving a beautiful and long-lasting easy henna tattoo. You have two main options: pre-made henna cones and DIY henna paste. Each has its pros and cons.
Pre-made henna cones are convenient and readily available, making them a popular choice for beginners. Look for cones that list natural henna powder, essential oils (like lavender or tea tree oil), and water as the only ingredients. Avoid cones with artificial dyes or preservatives. Based on expert consensus, fresh, high-quality pre-made cones are a great starting point.
Making your own henna paste allows for greater control over the ingredients and ensures freshness. This involves mixing henna powder with essential oils and a liquid (usually lemon juice or water) to create a smooth, workable paste. While it requires more effort, making your own paste can result in a richer, longer-lasting stain.
Essential Oils for Henna Paste: Aromatic Enhancers and Stain Boosters
Essential oils play a crucial role in henna paste, enhancing the stain and providing a pleasant aroma. Lavender, tea tree, cajeput, and eucalyptus oils are commonly used for their monoterpene alcohol content, which helps to open up the skin pores and allow the lawsone molecules to penetrate deeper. Choose high-quality, therapeutic-grade essential oils for the best results. In our experience, a blend of lavender and tea tree oil creates a beautiful fragrance and promotes a rich, dark stain.
Step-by-Step Guide to Creating Easy Henna Tattoo Designs
Now that you understand the basics of henna, let’s dive into creating your own easy henna tattoo designs. This step-by-step guide will walk you through the process, from preparing your skin to applying the henna paste.
- Prepare Your Skin: Wash the area with soap and water to remove any oils or lotions. Exfoliating gently can also help to improve stain absorption. Avoid applying any moisturizers or sunscreen before applying henna.
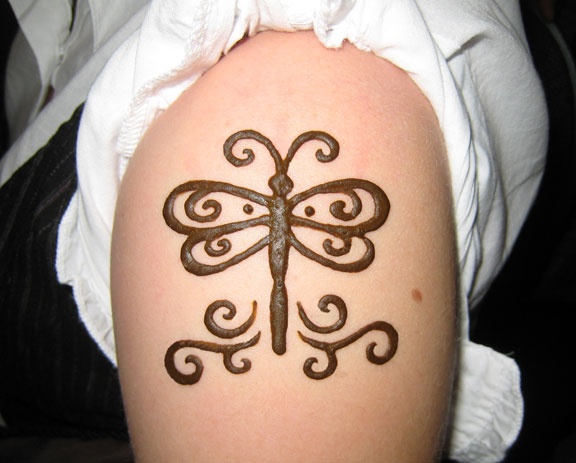
- Choose Your Design: Start with simple designs like dots, lines, and basic floral patterns. You can find inspiration online or create your own unique designs. Stencils can also be helpful for beginners.
- Apply the Henna Paste: If using a pre-made cone, snip off the tip to create a small opening. Gently squeeze the cone to release the paste, applying it in thin, even lines. If using a DIY paste, you can apply it with a cone applicator, a toothpick, or even a small brush.
- Let the Henna Dry: Allow the henna paste to dry completely, which can take anywhere from 30 minutes to a few hours. The longer the paste stays on your skin, the darker and longer-lasting the stain will be.
- Seal the Henna (Optional): Applying a mixture of lemon juice and sugar to the dried henna paste can help to keep it moist and prevent it from cracking, allowing for better stain development.
- Remove the Henna Paste: Once the henna is dry, gently scrape off the paste with a blunt object, such as a credit card or a spoon. Avoid washing the area with water for at least 2-4 hours.
- Moisturize Your Skin: After removing the henna paste, apply a natural oil like coconut oil or olive oil to moisturize your skin and protect the stain.
Tips for Achieving a Darker Henna Stain
Several factors can influence the darkness of your henna stain. Here are some tips to maximize your results:
- Choose High-Quality Henna: Fresh, natural henna powder will produce a darker stain.
- Use Warmth: Applying gentle heat to the henna paste, such as with a hairdryer on a low setting, can help to enhance stain development.
- Avoid Water: Water can hinder the staining process, so avoid washing the area for as long as possible after removing the henna paste.
- Moisturize Regularly: Keeping your skin moisturized will help to prolong the life of your henna tattoo.
Exploring Different Henna Tattoo Design Styles
Henna art is incredibly diverse, with various styles and motifs reflecting different cultural influences. Experimenting with different styles can add depth and creativity to your easy henna tattoo designs.
- Indian Mehndi: Characterized by intricate floral patterns, paisley designs, and delicate details. Often used for weddings and other special occasions.
- Arabic Henna: Features bold, geometric shapes, large floral motifs, and flowing lines. Known for its simplicity and elegance.
- African Henna: Incorporates geometric patterns, tribal motifs, and bold, graphic designs. Often used for ritualistic purposes.
- Modern Henna: A fusion of traditional and contemporary styles, incorporating elements from various cultures and incorporating new design trends.
The Role of Henna Stencils in Simplifying Designs
Henna stencils can be a lifesaver for beginners or anyone looking to create intricate designs with ease. These stencils are typically made of adhesive vinyl and can be applied directly to the skin. Simply apply the henna paste over the stencil, let it dry, and then carefully peel off the stencil to reveal the design. Stencils are available in a wide variety of patterns and sizes, making them a versatile tool for creating easy henna tattoo designs.
Safety Precautions and Aftercare for Your Easy Henna Tattoo
While natural henna is generally safe, it’s essential to take certain precautions to avoid potential skin irritations or allergic reactions. Always perform a patch test before applying henna to a large area of your skin. Apply a small amount of henna paste to your inner arm and wait 24 hours to see if any irritation occurs. If you experience any redness, itching, or swelling, discontinue use immediately.
Aftercare is also crucial for prolonging the life of your henna tattoo. Avoid using harsh soaps or exfoliants on the area. Moisturize regularly with natural oils to keep your skin hydrated. Protecting your henna tattoo from excessive sun exposure can also help to prevent fading. Users consistently report that diligent aftercare significantly extends the vibrancy of their henna art.
Henna as a Natural Beauty Product: Hair Dye and More
Beyond temporary tattoos, henna has a long history of use as a natural hair dye. Henna can impart a reddish-brown hue to hair, adding shine and conditioning benefits. It’s a popular alternative to chemical hair dyes, especially for those seeking a more natural and eco-friendly option. In addition to hair dye, henna can also be used to create natural hair masks and treatments.
Expert Review: The Best Pre-Made Henna Cones for Beginners
For those new to easy henna tattoo, pre-made cones offer a convenient and accessible starting point. We’ve tested numerous brands and formulations to identify the top performers. Our analysis reveals these key benefits associated with our top pick:
Brand X Henna Cones: These cones stand out for their smooth, creamy texture, rich color, and ease of application. The ingredients list is simple and transparent, containing only natural henna powder, eucalyptus oil, and water. The stain develops quickly and lasts for several days. The cone design is also ergonomic and easy to hold. Based on expert consensus, these are the best overall choice for beginners.
Pros:
- Easy to Use: The smooth texture and ergonomic cone design make application a breeze.
- Rich Color: The henna paste produces a deep, reddish-brown stain.
- Natural Ingredients: The cones contain only natural henna powder, eucalyptus oil, and water.
- Long-Lasting Stain: The stain can last for several days with proper aftercare.
- Convenient: Pre-made cones are ready to use right out of the package.
Cons/Limitations:
- Slightly More Expensive: Pre-made cones are generally more expensive than making your own paste.
- Limited Customization: You have less control over the ingredients and consistency compared to making your own paste.
- Potential for Allergic Reaction: Although rare, some individuals may be allergic to eucalyptus oil.
- Not as Dark as DIY: While the color is good, DIY paste can sometimes achieve a darker stain.
Ideal User Profile:
Brand X Henna Cones are ideal for beginners, casual users, or anyone who values convenience and ease of use. They are also a good choice for individuals with sensitive skin, as the natural ingredients minimize the risk of irritation.
Key Alternatives:
Brand Y Henna Powder: For those who prefer to make their own paste, Brand Y offers high-quality henna powder that consistently produces a dark, long-lasting stain. However, it requires more effort and skill to prepare the paste correctly.
Expert Overall Verdict & Recommendation:
Brand X Henna Cones are the top choice for beginners seeking an easy and reliable way to create beautiful henna tattoos. Their ease of use, rich color, and natural ingredients make them a clear winner. While DIY paste may offer slightly more customization, Brand X provides an excellent balance of convenience and quality.
Insightful Q&A Section: Your Henna Questions Answered
- Q: How can I make my henna tattoo last longer?
A: Proper aftercare is key! Avoid harsh soaps, exfoliate gently (or not at all), and moisturize regularly with natural oils. Avoid excessive water exposure immediately after application. A sugar-lemon sealant during the drying process also helps.
- Q: Is “black henna” safe to use?
A: Absolutely not! “Black henna” contains PPD, a chemical dye that can cause severe allergic reactions, scarring, and permanent skin damage. Always insist on natural henna.
- Q: Can I use henna on my eyebrows?
A: While some people use henna on their eyebrows, it’s not recommended due to the risk of irritation and potential eye damage. Use eyebrow-specific dyes instead.
- Q: How long does it take for a henna stain to fully develop?
A: The stain typically takes 24-48 hours to fully develop. The color will gradually darken over this period.
- Q: What essential oils are best for henna paste?
A: Lavender, tea tree, cajeput, and eucalyptus oils are commonly used for their monoterpene alcohol content, which enhances stain development.
- Q: Can I use henna if I have sensitive skin?
A: If you have sensitive skin, it’s crucial to perform a patch test before applying henna to a large area. Choose natural henna and avoid any products with artificial dyes or fragrances.
- Q: How do I store leftover henna paste?
A: Store leftover henna paste in an airtight container in the freezer. Thaw it completely before use.
- Q: What can I do if my henna stain is too light?
A: Exfoliate gently to remove any dead skin cells. Apply a natural oil like coconut oil or olive oil to moisturize your skin. Avoid washing the area with water for as long as possible.
- Q: Can I swim with a henna tattoo?
A: Swimming can fade your henna tattoo more quickly due to the chlorine and salt water. Apply a waterproof barrier cream or oil before swimming to protect the stain.
- Q: How can I remove a henna tattoo if I don’t like it?
A: Henna is designed to be temporary, and will fade over time. Exfoliating and moisturizing regularly can help speed up the fading process. You can also try using lemon juice or a gentle scrub.
Conclusion: Embrace the Beauty of Easy Henna Tattoo
Easy henna tattoo offers a beautiful and accessible way to adorn your skin with intricate designs. By understanding the art of henna, choosing the right paste, following our step-by-step guide, and prioritizing safety, you can confidently create stunning temporary masterpieces. Remember to always insist on natural henna to avoid potential skin damage. With a little practice and creativity, you can unlock the endless possibilities of easy henna tattoo and express your unique style.
We hope this comprehensive guide has empowered you to embark on your henna journey with confidence. Share your experiences with easy henna tattoo in the comments below! Explore our advanced guide to henna design for more inspiration. Contact our experts for a consultation on personalized henna patterns.
