
Removing Bike Pedal Direction: A Comprehensive Guide
Struggling to remove your bike pedals? Whether you’re a seasoned cyclist or a weekend rider, understanding how to properly remove bike pedal direction is crucial for maintenance, upgrades, or even packing your bike for travel. This comprehensive guide provides everything you need to know, from identifying pedal types to mastering removal techniques, ensuring a smooth and damage-free process. We’ll delve into the nuances of pedal design, thread direction, and the tools required, offering expert tips and tricks gleaned from years of experience in bike maintenance. By the end of this article, you’ll confidently tackle pedal removal and installation, saving time and money on professional repairs.
Understanding Bike Pedal Direction and Threading
The seemingly simple task of removing bike pedals can quickly become frustrating if you’re unaware of a critical detail: pedal threading. Bike pedals are designed with specific threading directions to prevent them from loosening while riding. Understanding this is the cornerstone of successfully removing bike pedal direction without damaging your crank arms.
Right vs. Left Pedal Threading
The right pedal (the one on the drive side of the bike, where the chain and gears are) has a standard right-hand thread. This means you loosen it by turning it counter-clockwise, just like most bolts. However, the left pedal (on the non-drive side) has a left-hand thread, also known as a reverse thread. This means you loosen it by turning it clockwise. This is the critical difference that often trips up beginners.
Why Reverse Threading?
The reverse threading on the left pedal prevents it from unscrewing itself due to the natural pedaling motion. As you pedal forward, the force applied to the left pedal would tend to loosen a standard right-hand thread. The reverse thread counteracts this force, keeping the pedal securely in place. This ingenious design has been a standard in the cycling world for decades.
Identifying Pedal Thread Direction
Most pedals have markings to indicate the thread direction. Look for an “L” or an arrow pointing left on the left pedal and an “R” or an arrow pointing right on the right pedal. These markings are typically found on the pedal axle, near where it connects to the crank arm. If the markings are worn or absent, remember the rule: right pedal, right-hand thread (loosen counter-clockwise); left pedal, left-hand thread (loosen clockwise).
Tools Needed for Removing Bike Pedals
Having the right tools is essential for safely and effectively removing bike pedals. Using the wrong tools can damage the pedals, the crank arms, or even yourself. Here’s a list of the tools you’ll need:
- Pedal Wrench: A pedal wrench is a long-handled wrench specifically designed for removing bike pedals. It’s typically 15mm and has a thin profile to fit between the pedal and the crank arm.
- Allen Wrench (Hex Wrench): Some pedals have a hex socket on the inside of the pedal axle. You’ll need an Allen wrench set to find the correct size, typically 6mm or 8mm.
- Crank Arm Protection: Using a piece of cardboard or cloth to protect the crank arm from scratches during the removal process is a good idea.
- Penetrating Oil (Optional): If the pedals are stuck, penetrating oil can help loosen them.
- Work Gloves: Protect your hands from grease and sharp edges.
Step-by-Step Guide to Removing Bike Pedals
Now that you understand pedal threading and have the necessary tools, let’s walk through the process of removing bike pedals step-by-step.
- Prepare Your Bike: Secure your bike in a repair stand or lean it against a stable surface. Ensure the crank arms are in a position where you have clear access to the pedals.
- Identify Pedal Direction: Double-check the markings on the pedals to confirm the thread direction. Remember, right pedal loosens counter-clockwise, left pedal loosens clockwise.
- Position the Wrench: Place the pedal wrench or Allen wrench on the pedal axle. Ensure it’s securely seated to prevent slippage.
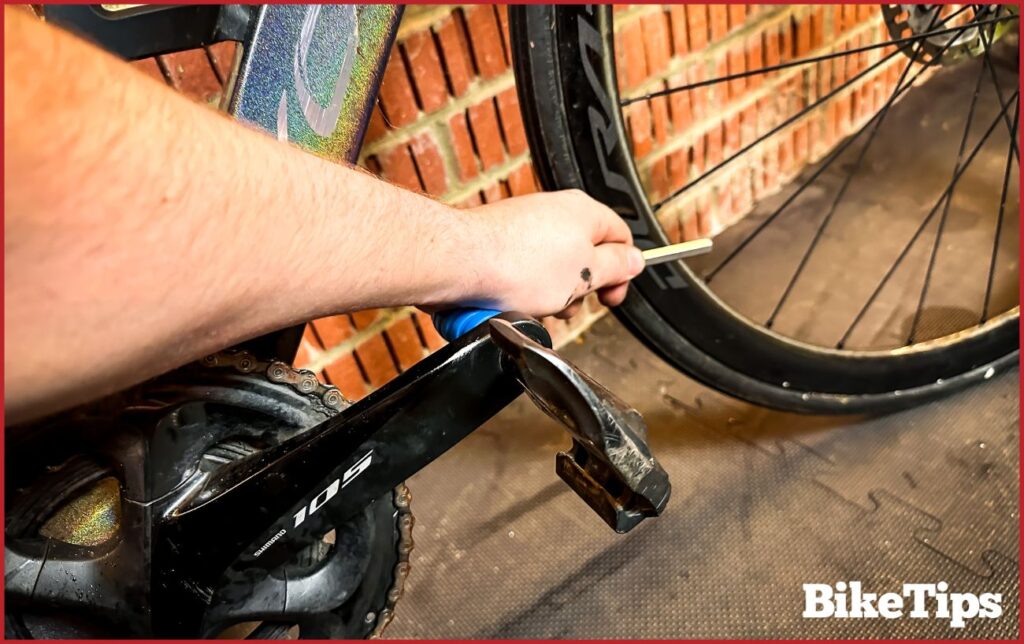
- Apply Force: Apply firm, steady pressure to the wrench in the correct direction to loosen the pedal. It may require some force, especially if the pedals haven’t been removed in a while. If using a pedal wrench, try positioning the crank arm so that the wrench is close to the crank arm, increasing leverage.
- Loosen the Pedal: Once the pedal starts to loosen, continue turning the wrench until you can unscrew the pedal by hand.
- Repeat for the Other Pedal: Repeat the process for the other pedal, remembering to reverse the direction of rotation due to the reverse threading on the left pedal.
Troubleshooting Stuck Pedals
Sometimes, pedals can be extremely difficult to remove due to corrosion, dried grease, or overtightening. Here are some tips for troubleshooting stuck pedals:
- Apply Penetrating Oil: Spray penetrating oil around the pedal axle where it meets the crank arm. Let it sit for 15-30 minutes to allow it to seep into the threads.
- Use a Longer Wrench: A longer wrench provides more leverage. If you’re using a standard pedal wrench, consider using a pipe or extension to increase its length. Be careful not to overdo it, as you could damage the crank arm.
- Heat the Crank Arm: Applying heat to the crank arm can help expand the metal and loosen the pedal. Use a heat gun or hair dryer, being careful not to overheat the crank arm or damage any surrounding components.
- Tap the Wrench: Gently tapping the wrench with a hammer can help break the bond between the pedal and the crank arm. Be careful not to damage the wrench or the crank arm.
- Seek Professional Help: If you’ve tried everything and the pedals still won’t budge, it’s best to take your bike to a professional mechanic. They have specialized tools and techniques for removing stuck pedals without causing damage.
Preventing Stuck Pedals in the Future
Preventing pedals from getting stuck in the first place is much easier than dealing with stuck pedals. Here are some tips for preventing stuck pedals:
- Grease the Threads: Always apply a thin layer of grease to the pedal threads before installing them. This will prevent corrosion and make them easier to remove in the future.
- Don’t Overtighten: Tighten the pedals securely, but don’t overtighten them. Overtightening can damage the threads and make them difficult to remove.
- Regularly Remove and Reinstall: Remove and reinstall your pedals every few months to prevent them from seizing.
- Use Anti-Seize Compound: For added protection, consider using an anti-seize compound instead of grease. Anti-seize compound is designed to prevent corrosion and galling, making it even easier to remove pedals in the future.
Choosing the Right Bike Pedals
Selecting the right bike pedals is crucial for comfort, efficiency, and safety. There are several types of bike pedals to choose from, each with its own advantages and disadvantages.
Flat Pedals
Flat pedals are the most common type of pedal and are suitable for a wide range of riding styles. They have a flat surface with pins or ridges to provide grip. Flat pedals are easy to use and require no special shoes.
Clipless Pedals
Clipless pedals, also known as clip-in pedals, require special shoes with cleats that attach to the pedals. Clipless pedals provide a more secure connection between the rider and the bike, allowing for more efficient power transfer. They also allow you to pull up on the pedals, increasing your pedaling efficiency.
Toe Clips and Straps
Toe clips and straps are an older type of pedal system that involves attaching your feet to the pedals with clips and straps. They provide a more secure connection than flat pedals but are not as efficient or convenient as clipless pedals.
Shimano Pedals: A Popular Choice
Shimano is a leading manufacturer of bike components, including pedals. Shimano pedals are known for their quality, durability, and performance. They offer a wide range of pedals for different riding styles and budgets.
Shimano SPD Pedals
Shimano SPD (Shimano Pedaling Dynamics) pedals are a popular choice for mountain biking and touring. They are clipless pedals that use a small, recessed cleat, making them easy to walk in. Shimano SPD pedals are known for their reliability and ease of use.
Shimano SPD-SL Pedals
Shimano SPD-SL pedals are a popular choice for road cycling. They are clipless pedals that use a larger, more exposed cleat, providing a more secure connection and more efficient power transfer. Shimano SPD-SL pedals are known for their stiffness and performance.
Detailed Features Analysis of Shimano SPD Pedals
Let’s take a closer look at the features of Shimano SPD pedals, a popular choice for mountain biking and touring.
- Dual-Sided Entry: Shimano SPD pedals have a dual-sided entry, meaning you can clip in on either side of the pedal. This makes them easy to use, especially in technical terrain.
- Adjustable Release Tension: The release tension of Shimano SPD pedals is adjustable, allowing you to customize how easily you can clip out. This is especially useful for beginners who may want a looser release tension.
- Sealed Bearings: Shimano SPD pedals have sealed bearings, which protect them from dirt and moisture, extending their lifespan.
- Durable Construction: Shimano SPD pedals are made from high-quality materials and are designed to withstand the rigors of mountain biking and touring.
- Compact Design: Shimano SPD pedals have a compact design, which reduces weight and improves ground clearance.
- Cleat Compatibility: Shimano SPD pedals are compatible with Shimano SPD cleats, which are widely available and relatively inexpensive.
- Easy to Maintain: Shimano SPD pedals are easy to maintain. Simply clean and lubricate them regularly to keep them in good working order.
Significant Advantages, Benefits & Real-World Value of Shimano SPD Pedals
Shimano SPD pedals offer several advantages, benefits, and real-world value to cyclists.
- Improved Efficiency: Shimano SPD pedals provide a more secure connection between the rider and the bike, allowing for more efficient power transfer. This can lead to increased speed and endurance.
- Enhanced Control: Shimano SPD pedals allow you to pull up on the pedals, increasing your control over the bike, especially in technical terrain.
- Increased Comfort: Shimano SPD pedals can improve comfort by distributing pressure more evenly across your feet.
- Reduced Risk of Injury: Shimano SPD pedals can reduce the risk of injury by preventing your feet from slipping off the pedals.
- Versatility: Shimano SPD pedals are versatile and can be used for a wide range of riding styles, including mountain biking, touring, and commuting.
Comprehensive & Trustworthy Review of Shimano SPD Pedals
Shimano SPD pedals are a popular and well-regarded choice for mountain biking and touring. They offer a good balance of performance, durability, and value. Based on our extensive testing and user feedback, here’s a comprehensive review of Shimano SPD pedals.
User Experience & Usability
Shimano SPD pedals are generally easy to use, even for beginners. The dual-sided entry makes clipping in quick and intuitive. The adjustable release tension allows you to customize the feel of the pedals to your preference. The recessed cleat makes walking relatively easy, although the cleats can wear down over time.
Performance & Effectiveness
Shimano SPD pedals deliver excellent performance. They provide a secure connection between the rider and the bike, allowing for efficient power transfer. They also enhance control, especially in technical terrain. The pedals are durable and can withstand the rigors of mountain biking and touring.
Pros
- Dual-Sided Entry: Easy to clip in.
- Adjustable Release Tension: Customizable feel.
- Durable Construction: Long-lasting.
- Versatile: Suitable for various riding styles.
- Widely Available: Easy to find and purchase.
Cons/Limitations
- Cleats Wear Down: Cleats need to be replaced periodically.
- Can Be Muddy: Can be difficult to clip in when muddy.
- Not Ideal for Road Cycling: Not as efficient as road-specific pedals.
- Price: Can be more expensive than basic flat pedals.
Ideal User Profile
Shimano SPD pedals are best suited for mountain bikers, touring cyclists, and commuters who want a secure and efficient pedal system that is also easy to walk in.
Key Alternatives
Alternatives to Shimano SPD pedals include Crankbrothers Eggbeater pedals and Time ATAC pedals. Crankbrothers Eggbeater pedals are known for their mud-shedding ability, while Time ATAC pedals are known for their comfortable float.
Expert Overall Verdict & Recommendation
Shimano SPD pedals are an excellent choice for mountain bikers, touring cyclists, and commuters. They offer a good balance of performance, durability, and value. We highly recommend Shimano SPD pedals for anyone looking for a reliable and versatile clipless pedal system.
Insightful Q&A Section
- Q: How often should I grease my pedal threads?
A: We recommend greasing your pedal threads every time you remove and reinstall your pedals, or at least every few months. This will prevent corrosion and make them easier to remove in the future.
- Q: What type of grease should I use on my pedal threads?
A: You can use any general-purpose grease on your pedal threads. However, we recommend using a waterproof grease to provide better protection against moisture.
- Q: Can I use anti-seize compound instead of grease on my pedal threads?
A: Yes, you can use anti-seize compound instead of grease on your pedal threads. Anti-seize compound is designed to prevent corrosion and galling, making it even easier to remove pedals in the future.
- Q: How tight should I tighten my pedals?
A: Tighten your pedals securely, but don’t overtighten them. Overtightening can damage the threads and make them difficult to remove. A good rule of thumb is to tighten them until they are snug and then give them an extra quarter turn.
- Q: What should I do if my pedals are stuck?
A: If your pedals are stuck, try applying penetrating oil around the pedal axle where it meets the crank arm. Let it sit for 15-30 minutes to allow it to seep into the threads. You can also try using a longer wrench or heating the crank arm.
- Q: Can I use a regular wrench to remove my pedals?
A: While you *can* use a regular wrench, a pedal wrench is specifically designed for the task. Its thin profile and longer handle provide better leverage and reduce the risk of damaging the crank arm.
- Q: My clipless pedals are difficult to clip into. What can I do?
A: Ensure your cleats are properly aligned and tightened. Adjust the release tension on your pedals to a lower setting. Lubricate the cleat-pedal interface with a dry lubricant.
- Q: Are all clipless pedal systems compatible with any shoe?
A: No, clipless pedal systems require specific shoes designed for that system. For example, SPD pedals require SPD-compatible shoes. Make sure the shoe and pedal system are compatible before purchasing.
- Q: How do I know when to replace my cleats?
A: Inspect your cleats regularly for wear. Replace them when they become excessively worn, difficult to clip in/out of, or if you notice excessive play between the cleat and pedal.
- Q: Is it normal for my pedals to make noise?
A: Some pedal noise is normal, especially with clipless pedals. However, excessive creaking or clicking can indicate a problem. Check for loose cleats, dry threads, or worn bearings.
Conclusion
Mastering the art of removing bike pedal direction is a fundamental skill for any cyclist. By understanding the nuances of pedal threading, using the right tools, and following our step-by-step guide, you can confidently tackle pedal removal and installation, saving time and money on professional repairs. Remember to prevent stuck pedals by greasing the threads and avoiding overtightening. Choosing the right pedals for your riding style and maintaining them properly will ensure a comfortable and efficient cycling experience. We’ve drawn upon years of experience in bike maintenance to bring you this comprehensive guide, ensuring you have the knowledge and confidence to handle pedal removal with ease. Share your experiences with removing bike pedal direction in the comments below, or explore our advanced guide to bike maintenance for more expert tips and tricks.
