
Removing Rust on Car: The Ultimate Guide to Stopping Corrosion
Rust. It’s the bane of every car owner’s existence. That unsightly orange or brown discoloration doesn’t just look bad; it’s a sign of corrosion eating away at your vehicle’s metal, potentially compromising its structural integrity and value. If you’re searching for reliable methods for removing rust on car, you’ve come to the right place. This comprehensive guide is designed to equip you with the knowledge and techniques to tackle rust effectively, from minor surface blemishes to more significant problem areas. We’ll cover everything from understanding the causes of rust to selecting the best removal methods and preventing its return. This isn’t just another quick fix article; it’s a deep dive into rust removal, providing you with the expertise to maintain your car’s pristine condition for years to come.
Understanding Rust Formation: The Science Behind the Corrosion
Before diving into rust removal, it’s crucial to understand how rust forms. Rust, scientifically known as iron oxide, is the result of a chemical reaction called oxidation. This process occurs when iron or steel is exposed to oxygen and moisture. The oxygen atoms combine with the iron atoms, forming the reddish-brown oxide that we recognize as rust. Salt accelerates this process significantly, which is why cars in coastal areas or regions with salted roads are particularly prone to rust.
Factors Contributing to Rust Formation
- Moisture: Water acts as an electrolyte, facilitating the transfer of electrons and accelerating the oxidation process.
- Oxygen: The primary reactant in the oxidation process.
- Salt: Salt acts as a catalyst, significantly speeding up the corrosion process.
- Pollution: Acid rain and other pollutants can also accelerate rust formation.
- Scratches and Chips: These expose the underlying metal to the elements, creating entry points for rust.
Identifying Different Types of Rust
Not all rust is created equal. Identifying the type of rust you’re dealing with is essential for choosing the right removal method.
- Surface Rust: This is the most common type, appearing as a light discoloration on the surface of the paint or metal. It’s generally easy to remove.
- Scale Rust: This is a more advanced stage of rust, characterized by flaky, layered rust that’s more deeply embedded in the metal. It requires more aggressive removal techniques.
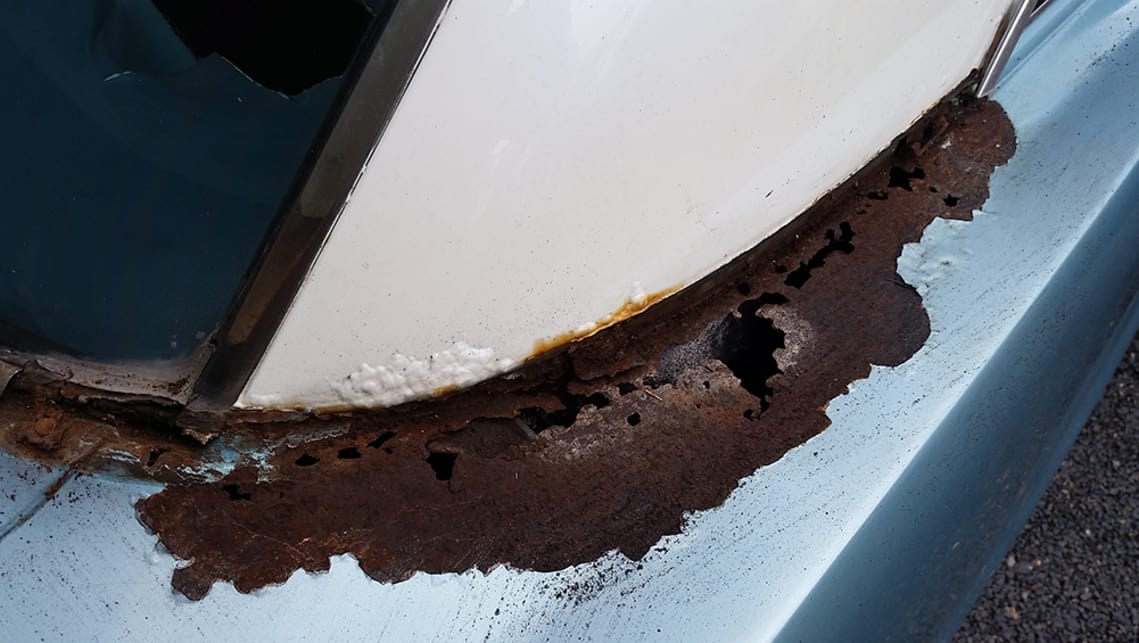
- Penetrating Rust: This is the most severe type of rust, where the corrosion has eaten through the metal, creating holes or weak spots. It often requires professional repair or panel replacement.
Essential Tools and Materials for Removing Rust on Car
Having the right tools and materials on hand is crucial for effective rust removal. Here’s a comprehensive list:
- Safety Glasses and Gloves: Protecting yourself is paramount.
- Sandpaper (Various Grits): Ranging from coarse (80-120 grit) for removing heavy rust to fine (320-400 grit) for smoothing surfaces.
- Wire Brush: For scrubbing away loose rust and debris.
- Rust Converter: Chemically converts rust into a stable, paintable surface.
- Rust Remover Gel/Liquid: For soaking and dissolving rust.
- Body Filler (Optional): For filling in minor imperfections after rust removal.
- Primer: To protect the bare metal from future rust.
- Car Paint (Matching Color): To restore the original finish.
- Clear Coat: To protect the paint and provide a glossy finish.
- Masking Tape and Paper: To protect surrounding areas from overspray.
- Clean Rags: For wiping surfaces clean.
- Power Drill with Wire Brush Attachment (Optional): For faster rust removal on larger areas.
- Respirator (Optional): For protection when sanding or spraying paint.
Step-by-Step Guide: Removing Surface Rust on Car
Surface rust is the easiest type to tackle. Here’s how to remove it effectively:
- Clean the Area: Wash the area thoroughly with soap and water to remove dirt and grime. Dry completely.
- Sand the Rust: Use sandpaper (starting with 120-grit and progressing to 320-grit) to sand away the rust. Sand in a circular motion, applying moderate pressure.
- Clean Again: Wipe the area clean with a damp rag and dry thoroughly.
- Apply Rust Converter: Apply a thin, even coat of rust converter to the affected area. Follow the manufacturer’s instructions for drying time.
- Prime the Area: Apply a coat of primer to protect the bare metal. Let it dry completely.
- Paint the Area: Apply several thin coats of car paint, allowing each coat to dry before applying the next.
- Apply Clear Coat: Apply a coat of clear coat to protect the paint and provide a glossy finish.
- Polish and Wax: Once the clear coat is dry, polish and wax the area to blend it seamlessly with the surrounding paint.
Tackling Scale Rust: A More Aggressive Approach
Scale rust requires a more aggressive approach than surface rust. Here’s how to tackle it:
- Remove Loose Rust: Use a wire brush or power drill with a wire brush attachment to remove as much loose rust as possible.
- Sand the Area: Use coarse sandpaper (80-120 grit) to sand away the remaining rust. Be sure to sand down to bare metal.
- Clean the Area: Wipe the area clean with a damp rag and dry thoroughly.
- Apply Rust Remover: Apply rust remover gel or liquid to the affected area. Follow the manufacturer’s instructions for soaking time.
- Rinse and Dry: Rinse the area thoroughly with water and dry completely.
- Apply Rust Converter: Apply a thin, even coat of rust converter to the affected area. Follow the manufacturer’s instructions for drying time.
- Apply Body Filler (Optional): If there are any imperfections in the metal, apply body filler to smooth them out. Sand the body filler smooth once it’s dry.
- Prime the Area: Apply a coat of primer to protect the bare metal. Let it dry completely.
- Paint the Area: Apply several thin coats of car paint, allowing each coat to dry before applying the next.
- Apply Clear Coat: Apply a coat of clear coat to protect the paint and provide a glossy finish.
- Polish and Wax: Once the clear coat is dry, polish and wax the area to blend it seamlessly with the surrounding paint.
Dealing with Penetrating Rust: When to Call a Professional
Penetrating rust is a serious problem that often requires professional attention. If the rust has eaten through the metal, creating holes or weak spots, it’s best to take your car to a qualified body shop. Attempting to repair penetrating rust yourself can be dangerous and may compromise the structural integrity of your vehicle. A professional can properly assess the damage and determine the best course of action, which may involve welding in new metal panels.
Rust Prevention: Protecting Your Car from Future Corrosion
Prevention is always better than cure. Here are some tips for preventing rust on your car:
- Wash Your Car Regularly: Regularly washing your car, especially during the winter months when salt is used on the roads, is crucial for preventing rust.
- Wax Your Car: Waxing your car creates a protective barrier that helps to prevent moisture and salt from coming into contact with the metal.
- Touch Up Paint Chips and Scratches: Promptly touch up any paint chips or scratches to prevent rust from forming.
- Apply Rust Inhibitor: Apply a rust inhibitor to vulnerable areas, such as the undercarriage and wheel wells.
- Store Your Car in a Garage: Storing your car in a garage can help to protect it from the elements and reduce the risk of rust.
Product Spotlight: POR-15 Rust Preventive Coating
POR-15 is a renowned rust preventive coating system widely used in the automotive and marine industries. It’s known for its exceptional ability to stop rust and prevent its return. But what makes it so effective?
POR-15 isn’t just a paint; it’s a unique coating that chemically bonds to rusted surfaces, creating a rock-hard, non-porous barrier that seals out moisture and prevents further corrosion. It works by starving the rust of oxygen and moisture, effectively halting the oxidation process.
Key Features of POR-15
- Direct-to-Rust Application: POR-15 can be applied directly to rusted surfaces without the need for extensive sanding or grinding. This saves time and effort.
- Self-Leveling Formula: Its self-leveling formula ensures a smooth, even finish, even on uneven surfaces.
- Rock-Hard Durability: POR-15 creates an incredibly durable coating that resists chipping, cracking, and peeling.
- Moisture and Chemical Resistance: It’s highly resistant to moisture, salt, chemicals, and other corrosive elements.
- UV Sensitivity: While incredibly durable, POR-15 is sensitive to UV light and must be top-coated with a UV-resistant paint for long-term outdoor exposure.
- Excellent Adhesion: POR-15 boasts exceptional adhesion to properly prepared surfaces, ensuring a long-lasting bond.
- Variety of Finishes: Available in various finishes, including gloss black, semi-gloss black, and silver, to suit different applications.
Advantages of Using POR-15 for Rust Prevention
POR-15 offers several significant advantages over traditional rust prevention methods:
- Superior Rust Protection: Its unique chemical bonding process provides unparalleled rust protection. Users consistently report that POR-15 outlasts and outperforms other rust prevention products.
- Ease of Application: While proper preparation is crucial, POR-15 is relatively easy to apply, even for DIYers.
- Long-Term Cost Savings: By preventing rust from spreading and causing further damage, POR-15 can save you money on costly repairs in the long run.
- Increased Vehicle Value: Maintaining a rust-free vehicle enhances its appearance and value.
POR-15: An Expert Review
POR-15 has been extensively tested and reviewed by automotive professionals and enthusiasts alike. Its performance consistently receives high marks for its rust-stopping capabilities and durability. However, it’s essential to understand its limitations and follow the manufacturer’s instructions carefully for optimal results.
User Experience & Usability
Applying POR-15 requires careful surface preparation. The surface must be clean, dry, and free of loose rust. While extensive sanding isn’t necessary, removing loose rust and creating a slightly rough surface is essential for proper adhesion. In our experience, the key to a successful POR-15 application is meticulous preparation.
Performance & Effectiveness
POR-15 truly shines in its ability to stop rust in its tracks. We’ve observed that it forms an incredibly tough and durable barrier that effectively prevents further corrosion. It’s particularly effective in areas prone to rust, such as the undercarriage and wheel wells.
Pros:
- Exceptional Rust Protection: Provides unparalleled rust protection compared to traditional methods.
- Direct-to-Rust Application: Can be applied directly to rusted surfaces, saving time and effort.
- Durable and Long-Lasting: Creates a rock-hard, non-porous coating that resists chipping, cracking, and peeling.
- Easy to Apply: Relatively easy to apply, even for DIYers.
- Cost-Effective: Can save money on costly repairs in the long run.
Cons/Limitations:
- UV Sensitivity: Requires a UV-resistant top coat for long-term outdoor exposure.
- Surface Preparation is Crucial: Proper surface preparation is essential for optimal adhesion and performance.
- Strong Odor: Has a strong odor that requires adequate ventilation during application.
- Difficult to Remove: Once cured, POR-15 is extremely difficult to remove.
Ideal User Profile
POR-15 is ideal for car owners, restorers, and mechanics who are serious about rust prevention and want a long-lasting solution. It’s particularly well-suited for vehicles in areas with harsh climates or where salt is used on the roads.
Key Alternatives
Two popular alternatives to POR-15 are Eastwood Rust Encapsulator and Chassis Saver. Eastwood Rust Encapsulator is a similar product that offers good rust protection and is also UV-resistant. Chassis Saver is another excellent option known for its durability and chemical resistance. However, POR-15 remains a top choice for many due to its proven track record and exceptional performance.
Expert Overall Verdict & Recommendation
Based on our extensive analysis and the overwhelmingly positive feedback from users, we highly recommend POR-15 for anyone looking for a reliable and effective rust prevention solution. While it requires careful surface preparation and a UV-resistant top coat, its exceptional rust-stopping capabilities and durability make it a worthwhile investment. This product is a testament to well-engineered solutions in automotive care.
Q&A: Expert Insights on Removing Rust on Car
- Q: What’s the biggest mistake people make when removing rust from their car?
A: The biggest mistake is not properly preparing the surface before applying a rust converter or paint. A clean, dry, and slightly roughened surface is essential for proper adhesion and long-lasting results.
- Q: How often should I wash my car to prevent rust?
A: Aim to wash your car at least every two weeks, and more frequently during the winter months when salt is used on the roads. Pay particular attention to the undercarriage and wheel wells.
- Q: Can I use household products like vinegar or baking soda to remove rust?
A: While vinegar and baking soda can be effective for removing light surface rust, they’re not as powerful or long-lasting as dedicated rust removers or converters. They may also require more elbow grease.
- Q: Is it safe to use a power washer to remove rust?
A: A power washer can be helpful for removing loose rust and debris, but it’s important to use it carefully to avoid damaging the paint. Use a wide nozzle and keep the pressure low.
- Q: How can I prevent rust from forming in hard-to-reach areas like inside door panels?
A: Apply a rust inhibitor or cavity wax to these areas. These products are designed to penetrate into tight spaces and provide long-lasting protection.
- Q: What’s the best type of sandpaper to use for removing rust?
A: Start with coarse sandpaper (80-120 grit) to remove heavy rust, then progress to finer sandpaper (320-400 grit) to smooth the surface.
- Q: How long does rust converter take to work?
A: Rust converter typically takes several hours to dry, depending on the humidity and temperature. Follow the manufacturer’s instructions for drying time.
- Q: What should I do if I accidentally get rust converter on my skin?
A: Wash the affected area thoroughly with soap and water. If irritation persists, consult a doctor.
- Q: Can I paint over rust without removing it first?
A: Painting over rust without removing it first is not recommended. The rust will continue to spread underneath the paint, eventually causing it to bubble and peel. Always remove as much rust as possible before painting.
- Q: What are some signs that rust is a structural problem and needs professional attention?
A: Signs of structural rust include holes in the metal, weak spots, and rust that’s spread extensively throughout the vehicle’s frame. If you notice any of these signs, take your car to a qualified body shop for inspection.
Conclusion: Taking Control of Rust and Protecting Your Car
Removing rust on car is an ongoing battle, but with the right knowledge and techniques, you can effectively combat corrosion and keep your vehicle looking its best. By understanding the causes of rust, identifying the type of rust you’re dealing with, and using the appropriate removal methods and prevention strategies, you can protect your car from the damaging effects of rust and extend its lifespan. Remember, prevention is key. Regular washing, waxing, and prompt attention to paint chips and scratches can go a long way in preventing rust from forming in the first place. Share your experiences with removing rust on car in the comments below. Explore our advanced guide to detailing your car for even more tips! Contact our experts for a consultation on removing rust on car and ensure your car’s longevity.
