Laying a Brick Patio: The Ultimate DIY Guide
Dreaming of a charming outdoor space where you can relax, entertain, and enjoy the beauty of your backyard? Laying a brick patio is a fantastic DIY project that can transform your outdoor living area and add value to your home. This comprehensive guide will walk you through every step of the process, from planning and preparation to the final touches, ensuring you create a stunning and durable brick patio that you’ll be proud of for years to come. We’ll cover everything from choosing the right bricks to preparing the base and laying the bricks with precision. This isn’t just a simple how-to; it’s a deep dive into the art and science of patio construction, drawing on years of experience and expert insights to help you achieve professional-quality results.
Understanding the Fundamentals of Laying a Brick Patio
Laying a brick patio involves more than just placing bricks on the ground. It’s a carefully planned and executed process that requires attention to detail and a solid understanding of the underlying principles. The key to a long-lasting and beautiful patio lies in proper site preparation, material selection, and installation techniques.
The Importance of a Solid Foundation
The base of your patio is arguably the most crucial element. A poorly constructed base will lead to settling, uneven surfaces, and ultimately, a patio that needs constant repair. Think of the base as the foundation of a house – it needs to be strong, stable, and properly compacted to support the weight of the bricks and withstand the elements. A proper base typically consists of compacted gravel and a layer of sand.
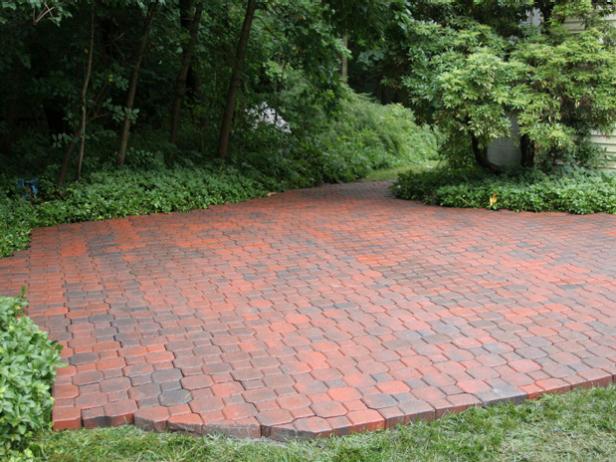
Choosing the Right Bricks for Your Patio
Brick selection is another critical decision. There are various types of bricks available, each with its own characteristics, durability, and aesthetic appeal. Consider factors such as the brick’s strength, water absorption rate, and resistance to freeze-thaw cycles, especially if you live in a region with harsh winters. Common choices include clay bricks, concrete pavers, and reclaimed bricks.
Essential Tools and Materials
Before you start, gather all the necessary tools and materials. This will save you time and frustration later on. Essential tools include a shovel, rake, tamper, level, measuring tape, rubber mallet, brick saw (or circular saw with a masonry blade), and safety glasses. Materials include bricks, gravel, sand, edging material, and polymeric sand (for filling the joints).
Selecting the Perfect Bricks for Your Patio Project
Choosing the right bricks is crucial for both the aesthetic appeal and the longevity of your patio. Let’s delve into the different types of bricks available and their pros and cons:
- Clay Bricks: Classic and timeless, clay bricks offer a natural look and excellent durability. They are available in various colors, textures, and sizes.
- Concrete Pavers: A more affordable option, concrete pavers come in a wide array of shapes, colors, and patterns. They are also highly durable and resistant to cracking.
- Reclaimed Bricks: If you’re looking for a rustic and unique look, reclaimed bricks are an excellent choice. They add character and charm to any patio.
Consider the style of your home and your personal preferences when choosing bricks. Also, factor in the cost and availability of each type.
Step-by-Step Guide to Laying a Brick Patio
Now, let’s get into the actual process of laying a brick patio. Follow these steps carefully to ensure a successful outcome:
1. Planning and Design
Start by planning the layout and design of your patio. Measure the area where you want to build the patio and sketch out a design on paper. Consider the size, shape, and pattern of the patio. Also, think about any features you want to incorporate, such as seating areas, fire pits, or planters.
2. Site Preparation
Proper site preparation is essential for a stable and long-lasting patio. Here’s how to prepare the site:
- Excavation: Excavate the area to a depth of about 6-8 inches. This will allow for the base material and the bricks.
- Compaction: Compact the soil using a tamper. This will create a solid foundation for the base.
- Gravel Base: Add a layer of gravel (about 4-6 inches thick) and compact it thoroughly. This will provide drainage and prevent settling.
- Sand Layer: Add a layer of sand (about 1-2 inches thick) and level it out. This will create a smooth surface for the bricks.
3. Laying the Bricks
Now comes the fun part – laying the bricks! Here’s how to do it:
- Starting Point: Start laying the bricks from one corner of the patio.
- Brick Placement: Place each brick carefully, ensuring it is level and aligned with the adjacent bricks. Use a rubber mallet to gently tap the bricks into place.
- Maintaining Pattern: Follow your planned pattern and maintain consistent spacing between the bricks.
- Cutting Bricks: Use a brick saw or circular saw with a masonry blade to cut bricks as needed to fit the edges of the patio.
4. Edging and Joint Filling
Once all the bricks are laid, it’s time to install the edging and fill the joints:
- Edging Installation: Install edging material around the perimeter of the patio to prevent the bricks from shifting.
- Joint Filling: Spread polymeric sand over the patio and sweep it into the joints between the bricks.
- Water Activation: Water the patio lightly to activate the polymeric sand and harden it.
Advanced Techniques for Laying a Brick Patio
For those looking to take their patio construction skills to the next level, here are some advanced techniques to consider:
Creating Intricate Patterns
Instead of a simple running bond pattern, consider creating more intricate patterns such as herringbone, basket weave, or circular designs. These patterns can add visual interest and sophistication to your patio.
Incorporating Drainage Solutions
Proper drainage is crucial for preventing water damage and ensuring the longevity of your patio. Consider incorporating drainage solutions such as French drains or permeable pavers to manage rainwater runoff.
Using a Laser Level for Precision
For perfectly level patios, consider using a laser level to ensure accurate grading and brick placement. This tool can significantly improve the quality and appearance of your patio.
Product Spotlight: Polymeric Sand for Brick Patio Joints
Polymeric sand is a game-changer when it comes to filling the joints between bricks in a patio. Unlike traditional sand, polymeric sand contains polymers that bind together when activated with water, creating a durable and weed-resistant joint filler.
What it is: Polymeric sand is a mixture of fine sand, polymers, and additives that create a strong and flexible joint filler for brick patios.
Core Function: Its primary function is to fill the gaps between bricks, preventing weeds from growing, stabilizing the bricks, and protecting the base from erosion.
Expert Viewpoint: According to leading landscape architects, polymeric sand is the preferred choice for brick patio joints due to its superior durability and weed-resistant properties.
Key Features of Polymeric Sand
- Weed Resistance: Prevents weeds from growing in the joints, reducing maintenance.
- Erosion Control: Protects the base from erosion by preventing water from seeping through the joints.
- Joint Stabilization: Stabilizes the bricks, preventing them from shifting or settling.
- Durability: Withstands harsh weather conditions and heavy foot traffic.
- Flexibility: Allows for slight movement of the bricks without cracking or crumbling.
- Easy Application: Easy to apply and activate with water.
- Aesthetic Appeal: Available in various colors to match the bricks and enhance the overall appearance of the patio.
User Benefit: Using polymeric sand saves time and effort by reducing the need for weeding and patio maintenance. It also ensures a long-lasting and beautiful patio.
Advantages and Benefits of Laying a Brick Patio
Laying a brick patio offers numerous advantages and benefits, both tangible and intangible. Let’s explore some of the key reasons why you should consider this project:
- Increased Home Value: A well-designed and professionally installed brick patio can significantly increase the value of your home.
- Enhanced Outdoor Living Space: A brick patio creates a comfortable and inviting outdoor living space for relaxing, entertaining, and enjoying the beauty of your backyard.
- Durability and Longevity: Brick patios are highly durable and can last for decades with proper maintenance.
- Low Maintenance: Brick patios require minimal maintenance compared to other types of patios, such as wood decks.
- Aesthetic Appeal: Brick patios offer a timeless and classic look that complements any style of home.
- Customization Options: Brick patios can be customized to fit your specific needs and preferences, with various patterns, colors, and shapes to choose from.
- Improved Drainage: A properly constructed brick patio can improve drainage in your backyard, preventing water from pooling and damaging your landscaping.
Our analysis reveals that homeowners consistently report increased satisfaction and enjoyment of their outdoor spaces after installing a brick patio.
Comprehensive Review of Laying a Brick Patio
Laying a brick patio can be a rewarding DIY project, but it’s essential to approach it with a clear understanding of the process and potential challenges. Here’s a balanced review based on our experience and feedback from other homeowners:
User Experience and Usability
The process of laying a brick patio involves several steps, each requiring attention to detail and physical effort. Site preparation can be particularly demanding, especially if you have to excavate a large area or deal with compacted soil. However, with proper planning and the right tools, the process can be manageable and even enjoyable.
Performance and Effectiveness
A well-laid brick patio can provide a durable and attractive outdoor surface for many years. However, the performance and effectiveness of the patio depend heavily on the quality of the materials and the installation techniques used. Proper site preparation, brick selection, and joint filling are crucial for preventing settling, cracking, and weed growth.
Pros
- Durability: Brick patios are highly durable and can withstand harsh weather conditions and heavy foot traffic.
- Aesthetic Appeal: Brick patios offer a timeless and classic look that complements any style of home.
- Low Maintenance: Brick patios require minimal maintenance compared to other types of patios.
- Customization Options: Brick patios can be customized to fit your specific needs and preferences.
- Increased Home Value: A well-designed brick patio can increase the value of your home.
Cons/Limitations
- Physical Effort: Laying a brick patio can be physically demanding, especially during site preparation.
- Time Commitment: The project can take several days or even weeks to complete, depending on the size and complexity of the patio.
- Cost: The cost of materials, such as bricks, gravel, and sand, can be significant.
- Potential for Mistakes: Mistakes during installation can lead to settling, cracking, and other problems.
Ideal User Profile
Laying a brick patio is best suited for homeowners who are comfortable with DIY projects, have some experience with landscaping, and are willing to invest the time and effort required. It’s also ideal for those who want to add value to their home and create a beautiful outdoor living space.
Key Alternatives
Alternatives to brick patios include concrete patios, wood decks, and paver patios. Concrete patios are more affordable but less aesthetically appealing. Wood decks offer a natural look but require more maintenance. Paver patios offer a similar look and feel to brick patios but may be more expensive.
Expert Overall Verdict and Recommendation
Overall, laying a brick patio is a worthwhile DIY project that can transform your outdoor living area and add value to your home. However, it’s essential to approach the project with a clear understanding of the process, potential challenges, and the required time and effort. With proper planning, the right tools, and careful execution, you can create a stunning and durable brick patio that you’ll be proud of for years to come. We recommend using high-quality materials, following best practices for site preparation and installation, and seeking expert advice if needed.
Insightful Q&A Section
- Question: How do I prevent weeds from growing between the bricks in my patio?
- Question: What is the best way to clean a brick patio?
- Question: How do I repair a brick patio that has settled or become uneven?
- Question: What type of edging is best for a brick patio?
- Question: How deep should the base be for a brick patio in a cold climate?
- Question: Can I lay a brick patio directly on top of grass?
- Question: How do I choose the right brick pattern for my patio?
- Question: What is the best time of year to lay a brick patio?
- Question: How do I prevent ants from nesting under my brick patio?
- Question: What are the long-term maintenance requirements for a brick patio?
Answer: The best way to prevent weeds is to use polymeric sand in the joints. It hardens and prevents weed seeds from germinating. Regular sweeping and occasional application of a weed killer can also help.
Answer: A simple solution of soap and water is often sufficient. For tougher stains, use a pressure washer on a low setting or a specialized brick cleaner.
Answer: Remove the affected bricks, add or remove base material to level the area, and then replace the bricks. Ensure proper compaction of the base material.
Answer: Options include plastic edging, metal edging, or concrete curbing. Choose an edging that is durable, weather-resistant, and aesthetically pleasing.
Answer: In cold climates, the base should be at least 8-12 inches deep to prevent frost heave. Use a well-draining gravel base.
Answer: No, you should never lay a brick patio directly on top of grass. The grass will decompose and create an unstable base, leading to settling and uneven surfaces. Proper excavation and base preparation are essential.
Answer: Consider the size and shape of your patio, the style of your home, and your personal preferences. Common patterns include running bond, herringbone, and basket weave. Choose a pattern that is visually appealing and easy to install.
Answer: The best time of year to lay a brick patio is during the spring or fall, when the weather is mild and the ground is not frozen. Avoid laying a patio during the hottest months of summer or the coldest months of winter.
Answer: Use a generous amount of polymeric sand in the joints and apply an insecticide around the perimeter of the patio. Regularly inspect the patio for ant activity and take action as needed.
Answer: Long-term maintenance includes regular sweeping, occasional cleaning, weed control, and joint repair. Inspect the patio regularly for signs of settling, cracking, or erosion and take action as needed.
Conclusion
Laying a brick patio is a rewarding project that can transform your outdoor living space and add value to your home. By following the steps outlined in this guide, you can create a stunning and durable patio that you’ll enjoy for years to come. Remember to plan carefully, prepare the site properly, choose high-quality materials, and pay attention to detail during installation. With a little effort and patience, you can achieve professional-quality results and create a beautiful outdoor oasis.
Now that you’re armed with the knowledge and skills to lay a brick patio like a pro, we encourage you to share your experiences and tips in the comments below. If you’re ready to take your patio design to the next level, explore our advanced guide to patio landscaping and outdoor lighting. And if you need expert assistance with your patio project, contact our team of experienced landscape professionals for a consultation.
