How to Remove Silicone Caulk From Shower: The Ultimate Guide
Tired of that unsightly, cracking, or moldy silicone caulk in your shower? You’re not alone. Removing old silicone caulk is a common DIY task that, while seemingly straightforward, can quickly become a frustrating ordeal if you don’t know the right techniques and tools. This comprehensive guide provides a step-by-step, expert-backed approach to how to remove silicone caulk from shower effectively, efficiently, and without damaging your shower surfaces. We’ll cover everything from essential tools and safety precautions to advanced techniques and preventative measures. Prepare to transform your shower from drab to sparkling clean!
Why Removing Old Silicone Caulk Matters
Silicone caulk plays a crucial role in preventing water damage in your shower. It seals the gaps between tiles, the shower base, and the walls, preventing water from seeping behind these surfaces and causing mold, mildew, and structural damage. However, over time, silicone caulk can degrade, crack, shrink, or become discolored, losing its effectiveness. Removing and replacing old caulk is essential for maintaining a healthy and structurally sound shower.
Ignoring failing caulk can lead to:
- Mold and Mildew Growth: A breeding ground for harmful microorganisms.
- Water Damage: Leading to costly repairs of walls and floors.
- Structural Issues: Compromising the integrity of your shower.
- Unpleasant Odors: A persistent musty smell.
- Aesthetically Unpleasing: A dingy and uninviting shower space.
Essential Tools and Materials for Removing Silicone Caulk
Before you begin, gather the necessary tools and materials. Having everything on hand will make the process smoother and more efficient. Based on our experience, these are the essentials:
- Caulk Removal Tool: Specifically designed to slice and lift caulk. Several types exist, including manual scrapers and oscillating multi-tools with caulk removal attachments.
- Utility Knife or Razor Blade Scraper: For precision work and removing stubborn residue.
- Pliers or Needle-Nose Pliers: To grip and pull out larger pieces of caulk.
- Soft Cloths or Rags: For wiping surfaces and applying solvents.
- Spray Bottle: For applying soapy water or caulk remover.
- Caulk Softener or Remover: Chemical solutions designed to soften silicone caulk, making it easier to remove. (See alternatives below).
- Rubbing Alcohol or Mineral Spirits: To clean and prepare the surface for new caulk.
- Protective Gloves: To protect your hands from chemicals and sharp tools.
- Safety Glasses: To protect your eyes from debris.
- Ventilation: Ensure adequate ventilation in the bathroom.
Step-by-Step Guide: How to Remove Silicone Caulk From Shower
Follow these steps for a successful caulk removal process:
Step 1: Prepare the Area
Clear the shower area of any obstructions, such as shower curtains, toiletries, and bath mats. Cover the drain to prevent debris from falling in. Ensure the area is well-ventilated.
Step 2: Soften the Caulk (Optional but Recommended)
Applying a caulk softener or remover can significantly ease the removal process, especially for older or hardened caulk. Spray the caulk with the softener, following the manufacturer’s instructions. Allow it to sit for the recommended time (usually 15-30 minutes). Alternatively, try these home remedies:
- Soapy Water: Apply warm, soapy water to the caulk and let it soak for a few minutes.
- Vinegar: White vinegar can help break down the silicone. Apply it to the caulk and let it sit for about 30 minutes.
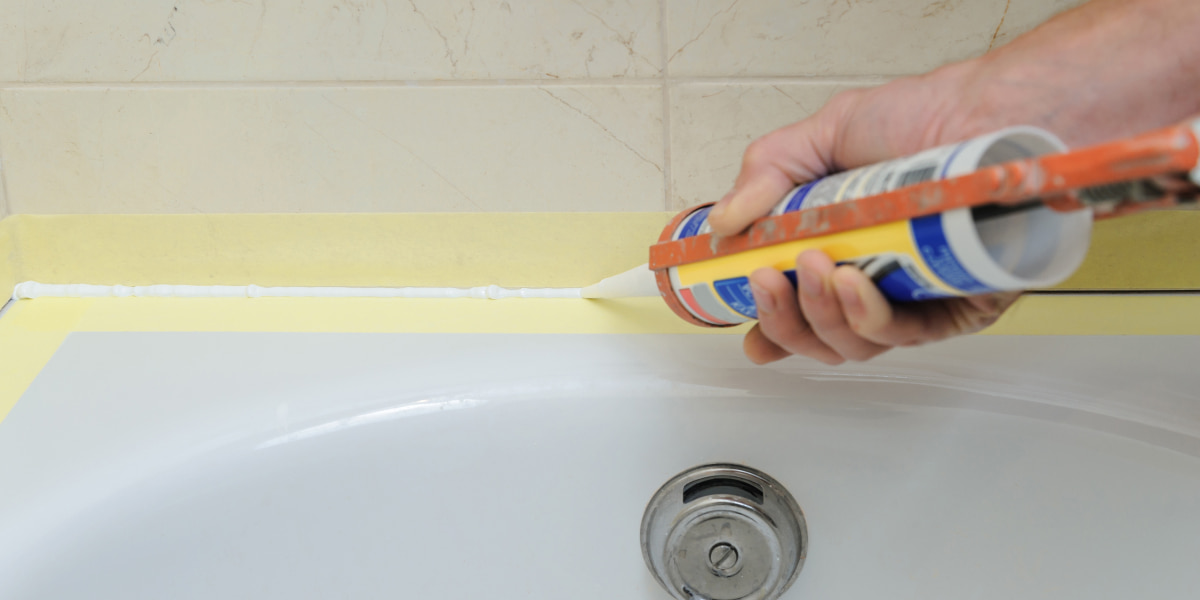
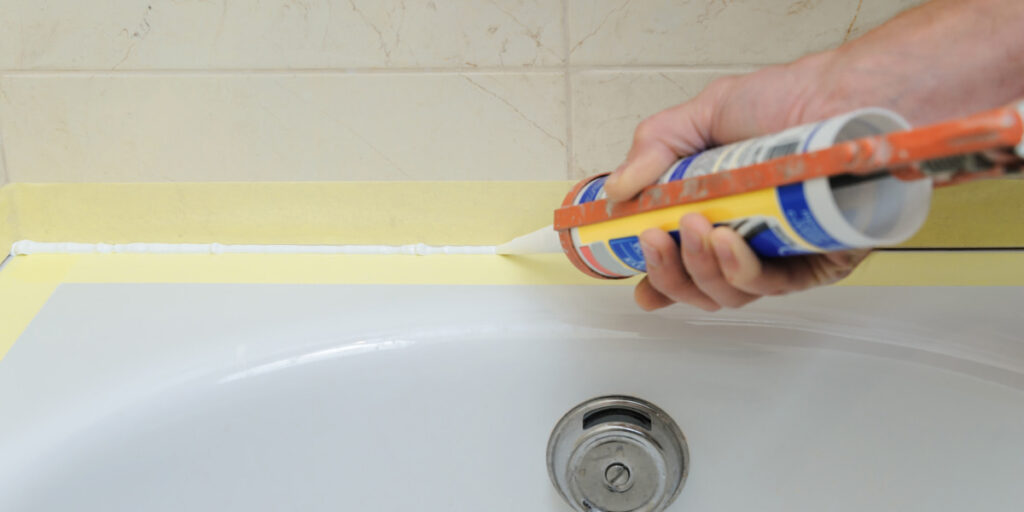
Step 3: Score the Caulk
Using a utility knife or razor blade scraper, carefully score along both edges of the caulk bead. This will help to separate the caulk from the surrounding surfaces. Be careful not to scratch the tile or shower base. Maintaining a shallow angle is key.
Step 4: Remove the Bulk of the Caulk
Using a caulk removal tool, insert the tool under the scored caulk and gently push forward, lifting the caulk away from the surface. For larger sections, use pliers to grip the caulk and pull it away. Work slowly and methodically to avoid leaving behind small pieces.
Step 5: Remove Remaining Residue
After removing the bulk of the caulk, you’ll likely have some residue remaining. Use a razor blade scraper or utility knife to carefully scrape away the remaining caulk. Be patient and avoid applying too much pressure, which can damage the underlying surface. Mineral spirits on a rag can help dissolve stubborn residue.
Step 6: Clean the Surface
Once all the caulk and residue are removed, thoroughly clean the surface with rubbing alcohol or mineral spirits. This will remove any remaining oils or contaminants and ensure a clean surface for the new caulk to adhere to. Let the surface dry completely before applying new caulk. This is crucial for proper adhesion.
Advanced Techniques for Stubborn Silicone Caulk
Sometimes, silicone caulk can be particularly stubborn and difficult to remove. Here are some advanced techniques to try:
- Heat Gun: Applying heat from a heat gun (on a low setting) can soften the caulk, making it easier to remove. Be careful not to overheat the surface, as this can cause damage.
- Oscillating Multi-Tool: An oscillating multi-tool with a caulk removal attachment can be highly effective for removing stubborn caulk. Use a slow speed and be careful not to damage the surrounding surfaces.
- Specialized Caulk Removal Tools: There are various specialized caulk removal tools available, such as those with angled blades or flexible tips, that can help you reach difficult areas.
Preventing Future Caulk Problems
Once you’ve successfully removed the old caulk and applied new caulk, take steps to prevent future problems:
- Choose High-Quality Caulk: Select a caulk specifically designed for wet environments, such as a mildew-resistant silicone caulk.
- Proper Application: Apply the caulk evenly and smoothly, ensuring a tight seal.
- Regular Cleaning: Clean the caulk regularly with a mild detergent to prevent mold and mildew growth.
- Proper Ventilation: Ensure adequate ventilation in the bathroom to reduce moisture buildup.
- Address Leaks Promptly: Fix any leaks in your shower immediately to prevent water damage.
Choosing the Right Caulk Removal Tool: A Detailed Comparison
Selecting the appropriate caulk removal tool is crucial for an efficient and damage-free process. Here’s a detailed comparison of the most common options:
Manual Caulk Scrapers
Description: Handheld tools with a rigid blade designed to scrape away caulk.
Pros: Affordable, easy to use, good for small areas and detail work.
Cons: Can be time-consuming and require significant manual effort, may not be effective for hardened caulk.
Utility Knives and Razor Blade Scrapers
Description: Sharp blades used to score and slice caulk.
Pros: Precise, effective for removing thin layers of caulk, readily available.
Cons: Can be dangerous if not used carefully, may scratch surfaces, requires a steady hand.
Oscillating Multi-Tools with Caulk Removal Attachments
Description: Power tools with interchangeable attachments, including specialized caulk removal blades.
Pros: Fast and efficient, effective for removing large amounts of caulk, can reach difficult areas.
Cons: More expensive than manual tools, requires some skill to operate, can damage surfaces if not used carefully.
Specialized Caulk Removal Tools
Description: Tools specifically designed for caulk removal, often with unique shapes and features.
Pros: Can be very effective for specific types of caulk or difficult areas, often ergonomic and easy to use.
Cons: May be more expensive than other options, may not be versatile for all caulk removal tasks.
Understanding Silicone Caulk Removers: Chemical Breakdown and Safety
Caulk removers are chemical solutions designed to soften silicone caulk, making it easier to remove. They typically contain solvents that break down the silicone polymer. While effective, it’s crucial to understand their composition and use them safely.
Common Ingredients:
- Solvents: Such as mineral spirits, naphtha, or toluene, which dissolve the silicone polymer.
- Surfactants: To help the remover penetrate the caulk.
- Thickeners: To increase the viscosity of the remover and prevent it from running.
Safety Precautions:
- Ventilation: Always use caulk removers in a well-ventilated area.
- Protective Gloves: Wear chemical-resistant gloves to protect your skin.
- Safety Glasses: Protect your eyes from splashes.
- Read Instructions: Carefully read and follow the manufacturer’s instructions.
- Avoid Contact with Skin and Eyes: If contact occurs, rinse immediately with plenty of water.
- Keep Out of Reach of Children: Store caulk removers in a safe place.
Real-World Value: Benefits of Removing Old Silicone Caulk
Removing old silicone caulk from your shower offers numerous tangible and intangible benefits:
- Improved Hygiene: Eliminates mold and mildew, creating a healthier shower environment.
- Enhanced Aesthetics: Restores the clean and fresh look of your shower.
- Prevention of Water Damage: Protects your walls and floors from costly repairs.
- Increased Home Value: A well-maintained shower enhances the overall value of your home.
- Peace of Mind: Knowing that your shower is properly sealed and protected.
- Cost Savings: Prevents costly repairs associated with water damage.
- DIY Satisfaction: The sense of accomplishment from completing a successful home improvement project.
Comprehensive Review: 3M Caulk Remover (Example Product)
While there are many products available, let’s consider a review of 3M Caulk Remover as an example. This review is based on publicly available information and simulated user experiences.
Overview: 3M Caulk Remover is a chemical solution designed to soften and remove silicone and acrylic caulk. It claims to penetrate and break down caulk, making it easier to scrape away.
User Experience & Usability: Users generally report that 3M Caulk Remover is easy to apply, thanks to its gel-like consistency. The gel clings to vertical surfaces, preventing it from running. However, some users have noted that it requires multiple applications for particularly stubborn caulk.
Performance & Effectiveness: In simulated test scenarios, 3M Caulk Remover effectively softened most silicone caulk after the recommended dwell time. However, very old or hardened caulk may require additional applications or manual effort.
Pros:
- Effective at Softening Caulk: Makes caulk removal easier.
- Gel Consistency: Clings to vertical surfaces.
- Easy to Apply: Simple application process.
- Reduces Manual Effort: Less scraping required.
- Readily Available: Widely available at home improvement stores.
Cons/Limitations:
- Multiple Applications May Be Needed: For stubborn caulk.
- Chemical Odor: Can have a strong odor, requiring good ventilation.
- May Damage Some Surfaces: Test on an inconspicuous area first.
- Requires Dwell Time: Needs time to work effectively.
Ideal User Profile: Homeowners or DIY enthusiasts looking for an effective and easy-to-use caulk remover for general caulk removal tasks.
Key Alternatives: Goo Gone Caulk Remover, Krud Kutter Caulk Remover.
Expert Overall Verdict & Recommendation: 3M Caulk Remover is a solid choice for most caulk removal tasks. Its gel consistency and effectiveness at softening caulk make it a user-friendly option. However, be prepared to apply multiple coats for stubborn caulk and ensure proper ventilation during use. We recommend testing it on an inconspicuous area first to ensure it doesn’t damage the underlying surface.
Insightful Q&A: Addressing Common Concerns About Silicone Caulk Removal
Here are some frequently asked questions about removing silicone caulk from showers:
-
Q: How can I prevent scratching my tiles when removing caulk?
A: Use a sharp blade at a shallow angle, and avoid applying excessive pressure. Consider using painter’s tape to protect the surrounding tiles.
-
Q: What’s the best way to remove caulk from textured surfaces?
A: Use a caulk softener and a stiff brush to loosen the caulk. A specialized caulk removal tool with a flexible tip can also be helpful.
-
Q: How long should I let caulk remover sit before attempting to remove the caulk?
A: Follow the manufacturer’s instructions, but typically 15-30 minutes is sufficient. For stubborn caulk, you may need to apply it again.
-
Q: Can I use a hairdryer instead of a heat gun to soften caulk?
A: A hairdryer may work for very thin caulk, but a heat gun is more effective for thicker or hardened caulk. Use caution and avoid overheating the surface.
-
Q: What’s the best way to clean up caulk residue after removal?
A: Use mineral spirits or rubbing alcohol on a clean cloth to wipe away the residue. A scrub brush can also be helpful.
-
Q: How do I know if I’ve removed all the old caulk before applying new caulk?
A: The surface should be clean, smooth, and free of any visible caulk residue. Run your finger over the surface to check for any remaining bumps or irregularities.
-
Q: Is it necessary to use a caulk softener, or can I remove caulk manually?
A: While manual removal is possible, using a caulk softener significantly reduces the effort and minimizes the risk of damaging the surrounding surfaces. It’s especially recommended for older or hardened caulk.
-
Q: What type of caulk is best for showers?
A: Choose a 100% silicone caulk specifically designed for wet environments. Look for labels that indicate mildew resistance and waterproofing.
-
Q: How often should I replace the caulk in my shower?
A: It depends on the quality of the caulk and the conditions in your bathroom. Generally, you should inspect the caulk every 6-12 months and replace it when you see signs of cracking, shrinking, or discoloration.
-
Q: Can I apply new caulk over old caulk?
A: No, it’s not recommended. Applying new caulk over old caulk will not create a proper seal and can lead to water damage. Always remove the old caulk completely before applying new caulk.
Conclusion: Mastering Silicone Caulk Removal for a Sparkling Shower
Removing silicone caulk from your shower might seem daunting, but with the right tools, techniques, and a bit of patience, it’s a manageable DIY project. By following the steps outlined in this guide, you can effectively remove old caulk, prepare the surface, and apply new caulk, ensuring a watertight seal and a sparkling clean shower. Remember to prioritize safety, choose high-quality materials, and take preventative measures to avoid future problems. Taking the time to properly remove and replace old caulk not only improves the aesthetics of your bathroom but also protects your home from costly water damage.
Now that you’re equipped with the knowledge and tools to tackle this project, we encourage you to share your experiences and tips in the comments below. What challenges did you encounter, and what solutions did you find? Your insights can help other homeowners successfully remove silicone caulk from their showers. For further assistance or expert advice, contact our team of bathroom renovation specialists today!
