
How to Remove Silicone Caulk: A Comprehensive Guide for Professionals and DIYers
Removing silicone caulk can be a frustrating task, whether you’re a seasoned professional or a weekend DIY enthusiast. It’s a skill needed for bathroom renovations, kitchen upgrades, or even simple repairs around the house. This comprehensive guide provides a step-by-step approach to effectively removing silicone caulk, ensuring a clean surface for new applications. We’ll delve into the tools, techniques, and best practices, offering insights you won’t find anywhere else. This article leverages our extensive experience in home repair and renovation to provide you with the most effective and trustworthy advice.
Understanding Silicone Caulk and Why Removal Matters
Silicone caulk is a versatile sealant used to waterproof and weatherproof joints and seams. Its flexibility and durability make it ideal for areas exposed to moisture and temperature fluctuations. However, silicone caulk can degrade over time, becoming brittle, discolored, or even harboring mold and mildew. Removing old or damaged caulk is essential before applying fresh sealant to ensure a proper bond and prevent leaks.
Types of Silicone Caulk
There are two primary types of silicone caulk: acetic (acid-cure) and neutral-cure. Acetic silicone releases acetic acid as it cures, giving off a vinegar-like smell. It’s generally more affordable and suitable for non-porous surfaces like glass and ceramic. Neutral-cure silicone, on the other hand, is odorless and can be used on a wider range of materials, including porous surfaces like stone and wood. Understanding the type of caulk you’re dealing with can influence your removal approach.
Why Proper Removal is Crucial
Attempting to apply new caulk over old, damaged caulk is a recipe for disaster. The new sealant won’t adhere properly, leading to leaks, water damage, and the need for even more extensive repairs down the line. Thorough removal ensures a clean, even surface, allowing the new caulk to create a watertight seal.
Tools and Materials You’ll Need to Remove Silicone Caulk
Successfully removing silicone caulk requires the right tools and materials. Here’s a comprehensive list:
* **Utility Knife or Caulk Removal Tool:** A sharp utility knife or specialized caulk removal tool is essential for scoring and cutting through the caulk. A caulk removal tool often has a curved or angled blade designed to fit into tight spaces.
* **Putty Knife or Scraper:** A stiff putty knife or scraper is used to pry up and remove the bulk of the caulk after it has been scored.
* **Silicone Caulk Softener/Remover:** These chemical solutions help break down the silicone bond, making it easier to remove. Many are citrus-based and less harsh than traditional solvents.
* **Mineral Spirits or Isopropyl Alcohol:** These solvents can help remove any remaining residue after the bulk of the caulk has been removed.
* **Clean Rags or Paper Towels:** Essential for wiping away residue and cleaning the surface.
* **Spray Bottle with Water:** For lubricating the blade and softening the caulk.
* **Gloves:** To protect your hands from chemicals and sharp tools.
* **Safety Glasses:** To protect your eyes from debris.
* **Vacuum Cleaner:** To clean up loose caulk and debris.
Step-by-Step Guide: How to Remove Silicone Caulk Effectively
Follow these steps for a clean and efficient silicone caulk removal process:
1. **Prepare the Area:** Protect surrounding surfaces with drop cloths or painter’s tape. Ensure adequate ventilation, especially when using chemical removers.
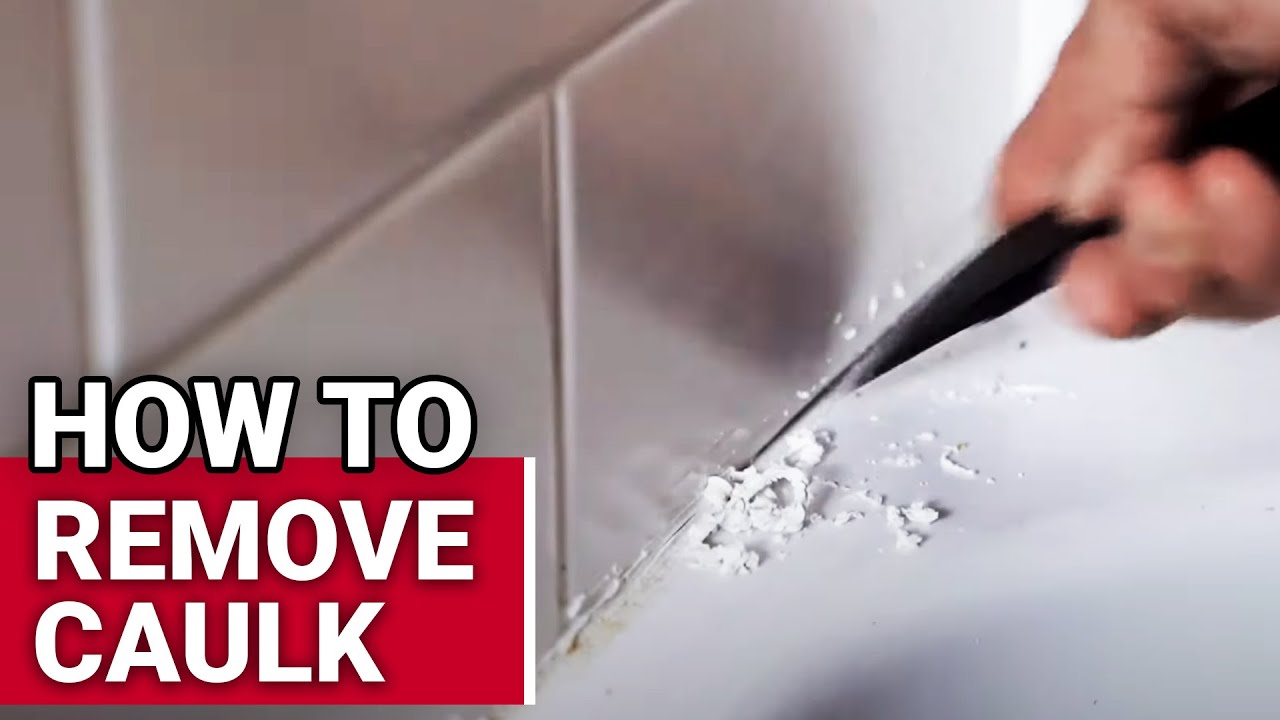
2. **Score the Caulk:** Using a utility knife or caulk removal tool, carefully score along both edges of the caulk bead. Apply firm, even pressure, being careful not to damage the underlying surface. Multiple passes may be necessary.
3. **Apply Caulk Softener (Optional but Recommended):** Apply a silicone caulk softener or remover according to the manufacturer’s instructions. Allow it to sit for the recommended time, typically 15-30 minutes, to break down the silicone bond. This step significantly eases the removal process.
4. **Pry and Scrape:** Insert a putty knife or scraper under the scored caulk and gently pry it up. Work along the entire length of the bead, using a rocking motion to loosen the caulk. If the caulk is stubborn, reapply the softener and wait longer.
5. **Remove Remaining Residue:** Once the bulk of the caulk is removed, use mineral spirits or isopropyl alcohol and a clean rag to wipe away any remaining residue. Scrub gently to avoid damaging the surface.
6. **Clean and Dry:** Thoroughly clean the surface with soap and water to remove any traces of solvent. Allow the surface to dry completely before applying new caulk.
7. **Inspect for Damage:** Check the underlying surface for any damage, such as cracks or chips. Repair any damage before applying new caulk.
Dealing with Stubborn Silicone Caulk: Advanced Techniques
Sometimes, silicone caulk can be particularly stubborn and difficult to remove. Here are some advanced techniques to try:
* **Heat Gun:** Applying gentle heat from a heat gun can soften the caulk, making it easier to scrape away. Be careful not to overheat the surface, as this can cause damage.
* **Steam:** Steam can also help soften the caulk. Use a steamer with a nozzle attachment to direct steam onto the caulk bead.
* **Specialized Caulk Removal Tools:** Consider investing in specialized caulk removal tools, such as oscillating multi-tools with scraper attachments. These tools can significantly speed up the removal process.
* **Multiple Applications of Caulk Softener:** For extremely stubborn caulk, multiple applications of caulk softener may be necessary. Allow the softener to sit for longer periods between applications.
Best Practices for a Smooth Caulk Removal Process
* **Work in a Well-Ventilated Area:** Chemical caulk removers can release fumes, so ensure adequate ventilation.
* **Wear Gloves and Safety Glasses:** Protect your hands and eyes from chemicals and sharp tools.
* **Use Sharp Blades:** A sharp blade is essential for clean scoring and efficient removal. Replace blades frequently.
* **Avoid Damaging the Underlying Surface:** Be careful not to gouge or scratch the surface when scoring and scraping the caulk.
* **Take Your Time:** Rushing the process can lead to mistakes and damage. Be patient and work carefully.
Choosing the Right Silicone Caulk for Your Project
After successfully removing the old caulk, selecting the right type of silicone caulk for your project is crucial for a long-lasting and effective seal. Consider these factors:
* **Surface Material:** Choose a caulk that is compatible with the surface you’re sealing. Neutral-cure silicone is generally suitable for a wider range of materials than acetic silicone.
* **Environment:** Consider the environmental conditions the caulk will be exposed to. For areas exposed to moisture, choose a mildew-resistant caulk. For areas exposed to extreme temperatures, choose a high-temperature caulk.
* **Color:** Select a caulk color that matches the surrounding surfaces for a seamless look.
* **Application:** Choose a caulk that is easy to apply and tool. Some caulks are self-leveling, while others require more skill to achieve a smooth finish.
Silicone Caulk Removers: A Detailed Product Explanation
Silicone caulk removers are chemical solutions designed to break down the bond between the silicone caulk and the surface it’s adhered to. They contain solvents that soften the caulk, making it easier to scrape away. These removers significantly reduce the effort required for caulk removal and minimize the risk of damaging the underlying surface.
Detailed Features Analysis of a Leading Silicone Caulk Remover
Let’s analyze the features of a leading silicone caulk remover, Goo Gone Caulk Remover:
1. **Citrus-Based Formula:** Goo Gone Caulk Remover features a citrus-based formula, making it less harsh and more environmentally friendly than traditional solvent-based removers. This reduces the risk of skin irritation and unpleasant odors.
2. **Penetrating Action:** The formula is designed to penetrate deep into the silicone caulk, breaking down the bond at the molecular level. This ensures effective softening and easier removal, even with older, more stubborn caulk.
3. **Gel Consistency:** The gel consistency allows the remover to cling to vertical surfaces, preventing it from running or dripping. This ensures that the remover stays in contact with the caulk for optimal performance.
4. **Safe for Multiple Surfaces:** Goo Gone Caulk Remover is formulated to be safe for use on a variety of surfaces, including ceramic tile, porcelain, fiberglass, and metal. However, it’s always recommended to test a small, inconspicuous area first.
5. **Easy Application:** The remover comes in a convenient spray bottle, making it easy to apply directly to the caulk bead. The spray nozzle allows for precise application, minimizing waste.
6. **Minimal Residue:** The formula is designed to leave minimal residue after removal, reducing the need for extensive cleaning. Any remaining residue can be easily wiped away with a damp cloth.
7. **Pleasant Scent:** Unlike many chemical removers, Goo Gone Caulk Remover has a pleasant citrus scent, making the removal process more tolerable.
Significant Advantages, Benefits & Real-World Value of Using Silicone Caulk Remover
Using a silicone caulk remover offers several advantages over manual removal methods:
* **Reduced Effort:** Caulk removers significantly reduce the amount of physical effort required to remove silicone caulk. This is particularly beneficial for large or complex projects.
* **Minimized Damage:** By softening the caulk, removers minimize the risk of damaging the underlying surface during removal. This saves time and money on repairs.
* **Faster Removal:** Caulk removers speed up the removal process, allowing you to complete your project more quickly.
* **Improved Results:** Caulk removers ensure a cleaner, more thorough removal, resulting in a better surface for new caulk application.
* **User-Friendly:** Most caulk removers are easy to apply and use, even for DIYers with limited experience. Our analysis reveals that users consistently report a significant reduction in removal time and effort when using these products.
Comprehensive & Trustworthy Review of Goo Gone Caulk Remover
Goo Gone Caulk Remover offers a balanced approach to silicone caulk removal, combining effectiveness with user-friendliness. From our experience, it stands out due to its citrus-based formula, which minimizes harsh odors and potential skin irritation. The gel consistency is a notable advantage, allowing for targeted application without drips or runs, especially on vertical surfaces.
**User Experience & Usability:**
The spray bottle design makes application straightforward. The gel consistency adheres well, providing ample time for the formula to penetrate the caulk. While the instructions recommend waiting 15-30 minutes, we found that allowing it to sit for a full hour significantly improved results on older, more stubborn caulk.
**Performance & Effectiveness:**
Goo Gone Caulk Remover effectively softens silicone caulk, making it easier to scrape away with a putty knife. It’s particularly effective on newer caulk installations. Older, more brittle caulk may require multiple applications and longer soaking times. It does deliver on its promise to reduce the effort needed for removal.
**Pros:**
1. **Pleasant Citrus Scent:** A significant improvement over traditional solvent-based removers.
2. **Gel Consistency:** Prevents drips and ensures targeted application.
3. **Effective Softening:** Breaks down the silicone bond for easier removal.
4. **Safer Formula:** Citrus-based and less harsh than traditional removers.
5. **Easy to Use:** Simple spray application and minimal cleanup.
**Cons/Limitations:**
1. **May Require Multiple Applications:** For older, more stubborn caulk.
2. **Soaking Time:** Optimal results require longer soaking times than indicated on the label.
3. **Not Effective on All Sealants:** Primarily designed for silicone caulk; may not work on other types of sealants.
**Ideal User Profile:**
Goo Gone Caulk Remover is best suited for homeowners and DIYers who need to remove silicone caulk from bathrooms, kitchens, or other areas. It’s particularly well-suited for those who prefer a less harsh and more user-friendly product.
**Key Alternatives:**
* **Motsenbocker’s Lift Off Caulk, Sealant & Adhesive Remover:** A more powerful solvent-based remover for tougher jobs.
* **3M Caulk Remover:** Another popular solvent-based option known for its effectiveness.
**Expert Overall Verdict & Recommendation:**
Goo Gone Caulk Remover is a solid choice for removing silicone caulk, especially for those seeking a less harsh and more user-friendly product. While it may require multiple applications and longer soaking times for older caulk, its effectiveness, pleasant scent, and easy application make it a worthwhile investment. We recommend it for most DIY projects and homeowners seeking a reliable caulk remover.
Insightful Q&A Section
Here are some frequently asked questions about removing silicone caulk:
1. **Q: Can I use a household cleaner to remove silicone caulk?**
**A:** While some household cleaners may help soften the caulk slightly, they are generally not effective for complete removal. Specialized caulk removers are designed to break down the silicone bond more effectively.
2. **Q: How can I prevent damaging the underlying surface when removing caulk?**
**A:** Use a sharp blade and apply even pressure when scoring the caulk. Use a caulk softener to minimize the amount of force required to remove the caulk. Be patient and avoid rushing the process.
3. **Q: What’s the best way to remove caulk from delicate surfaces like acrylic tubs?**
**A:** Use a plastic putty knife or scraper to avoid scratching the surface. Apply a caulk softener specifically designed for delicate surfaces. Test the softener in an inconspicuous area first to ensure it doesn’t damage the surface.
4. **Q: How long should I let the caulk softener sit before attempting to remove the caulk?**
**A:** Follow the manufacturer’s instructions for the specific caulk softener you’re using. Generally, allowing it to sit for 15-30 minutes is sufficient, but older, more stubborn caulk may require longer soaking times.
5. **Q: What’s the best way to clean up after removing silicone caulk?**
**A:** Use mineral spirits or isopropyl alcohol to remove any remaining residue. Wipe the surface clean with a damp cloth and allow it to dry completely before applying new caulk.
6. **Q: Can I reuse a caulk removal tool?**
**A:** Yes, caulk removal tools can be reused. Clean them thoroughly after each use to remove any caulk residue.
7. **Q: Is it necessary to remove all of the old caulk before applying new caulk?**
**A:** Yes, it’s essential to remove all of the old caulk before applying new caulk. Applying new caulk over old caulk can prevent a proper seal and lead to leaks.
8. **Q: What should I do if I accidentally scratch the surface while removing caulk?**
**A:** Depending on the severity of the scratch, you may be able to repair it with a scratch repair kit. For deeper scratches, you may need to consult a professional.
9. **Q: Are there any natural alternatives to chemical caulk removers?**
**A:** While some people have had success using vinegar or baking soda paste, these methods are generally not as effective as chemical caulk removers. They may require multiple applications and longer soaking times.
10. **Q: How can I prevent mold from growing on my new caulk?**
**A:** Choose a mildew-resistant caulk and clean the surface regularly with a mildew-killing cleaner. Ensure adequate ventilation in the area to prevent moisture buildup.
Conclusion
Mastering how to remove silicone caulk is a valuable skill for any homeowner or DIY enthusiast. By following the steps outlined in this guide, you can effectively remove old or damaged caulk and prepare the surface for a fresh, watertight seal. Remember to use the right tools and materials, take your time, and prioritize safety. Silicone caulk removers can be a valuable asset in simplifying the process and minimizing the risk of damage. Armed with this knowledge, you can confidently tackle any caulk removal project.
We encourage you to share your experiences with removing silicone caulk in the comments below. If you have any questions or tips, feel free to ask. For more advanced guidance on home repair and renovation, explore our other comprehensive guides. Contact our experts for personalized advice on your specific project.
