Damaged Nails After Acrylics: A Comprehensive Guide to Repair and Prevention
Are your nails weak, brittle, and peeling after removing acrylics? You’re not alone. Many women experience damaged nails after acrylics. This comprehensive guide will provide you with everything you need to know about repairing and preventing nail damage caused by acrylics, helping you restore your nails to their natural health and beauty. We’ll delve into the causes of the damage, explore effective treatment strategies, and provide expert tips for preventing future problems. Prepare to reclaim your healthy, strong nails!
Understanding the Causes of Damaged Nails After Acrylics
Acrylic nails, while aesthetically pleasing, can take a toll on your natural nails. Understanding the underlying causes of the damage is the first step toward effective repair and prevention. The damage isn’t always solely due to the acrylics themselves but also to the application and removal process.
The Application Process
The application of acrylic nails involves several steps that can contribute to nail damage:
* **Nail Filing:** To ensure proper adhesion, the natural nail surface is often filed down, thinning the nail plate. This makes the nails weaker and more susceptible to breakage.
* **Dehydration:** A dehydrator is typically applied to remove oils and moisture from the nail surface. While this promotes adhesion, it can also dry out the nails, making them brittle.
* **Adhesive Application:** The adhesive used to bond the acrylic nail to the natural nail can be harsh and damaging, especially with prolonged use.
The Removal Process
Improper removal is a major culprit in nail damage. Many people attempt to peel or pick off acrylics, which can tear off layers of the natural nail plate. This results in:
* **Thinning of the Nail Plate:** Peeling off acrylics forcibly removes layers of the natural nail, making them extremely thin and fragile.
* **Weakening of the Nail Structure:** The nail’s structural integrity is compromised, leading to splitting, peeling, and breakage.
* **Increased Susceptibility to Infection:** Damage to the nail plate can create openings for bacteria and fungi, increasing the risk of nail infections.
Chemical Exposure
The chemicals used in acrylic nail application and removal, such as acetone and acrylic monomers, can be harsh on the nails. Prolonged exposure to these chemicals can:
* **Dry Out the Nails:** Acetone, a common ingredient in nail polish remover, is a powerful solvent that can strip the nails of their natural oils and moisture.
* **Weaken the Nail Structure:** Acrylic monomers can weaken the protein structure of the nail, making them more prone to damage.
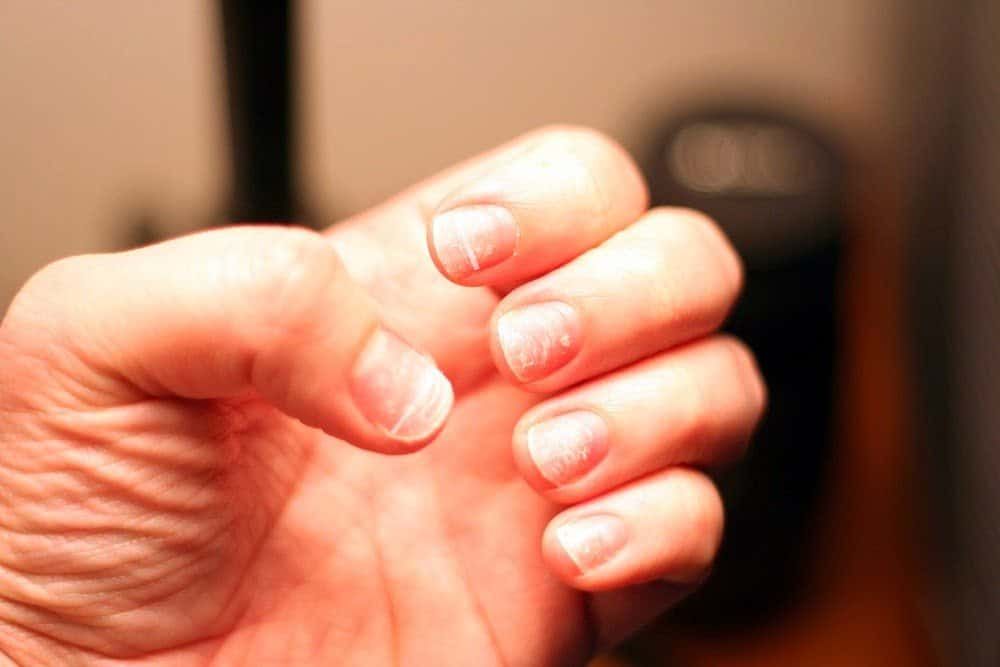
Identifying Different Types of Nail Damage
Damaged nails after acrylics can manifest in various ways. Recognizing the specific type of damage can help you choose the most appropriate treatment.
Thin and Weak Nails
This is one of the most common types of damage. Nails become noticeably thinner and more flexible, making them prone to bending and tearing. This is often a result of excessive filing and improper removal.
Brittle and Dry Nails
Nails may become dry, brittle, and prone to splitting or cracking. This is often caused by dehydration from dehydrators and acetone exposure.
Peeling Nails
The nail plate may start to peel or flake in layers, particularly at the tips. This is a sign of weakened nail structure, often resulting from peeling off acrylics.
Ridges and Grooves
Horizontal or vertical ridges may appear on the nail surface. These can be caused by trauma to the nail matrix (the area where the nail grows from).
White Spots (Leukonychia)
Small white spots may appear on the nails. These are usually caused by minor trauma to the nail matrix and are generally harmless.
Nail Infections
In severe cases, nail infections can develop. Signs of infection include redness, swelling, pain, and pus around the nail. Fungal infections can also cause the nail to thicken, discolor, and crumble.
Repairing Damaged Nails: A Step-by-Step Guide
Restoring your nails to health after acrylic damage requires patience and a consistent care routine. Here’s a step-by-step guide to help you repair your damaged nails.
Step 1: Assess the Damage
Before starting any treatment, take a close look at your nails to assess the extent of the damage. Identify the specific issues you’re dealing with, such as thinning, peeling, or brittleness. This will help you tailor your treatment plan.
Step 2: Trim and File Gently
Use a sharp nail clipper to trim your nails to a manageable length. Avoid cutting them too short, as this can further weaken them. Use a fine-grit nail file to gently smooth any rough edges or snags. File in one direction to prevent splitting.
Step 3: Hydrate and Moisturize
Hydration is key to repairing damaged nails. Apply a moisturizing nail cream or oil several times a day, especially after washing your hands. Look for products containing ingredients like:
* **Vitamin E:** A powerful antioxidant that helps protect and nourish the nails.
* **Jojoba Oil:** Mimics the natural oils of the skin and nails, providing deep hydration.
* **Shea Butter:** A rich emollient that helps to soften and moisturize the nails and cuticles.
* **Almond Oil:** A lightweight oil that helps to strengthen and condition the nails.
Step 4: Use a Nail Strengthener
Nail strengtheners contain ingredients that help to harden and protect the nails. Look for products containing:
* **Keratin:** A protein that helps to rebuild and strengthen the nail structure.
* **Calcium:** An essential mineral that helps to promote nail growth and strength.
* **Nylon Fibers:** Create a protective barrier on the nail surface, preventing breakage.
Apply the nail strengthener according to the product instructions. Some products are designed to be used as a base coat under nail polish, while others can be used alone.
Step 5: Protect Your Nails
Protect your nails from further damage by wearing gloves when doing household chores, such as washing dishes or gardening. Avoid using harsh chemicals or solvents on your nails. When applying nail polish, use a base coat to protect the nail surface from staining and damage.
Step 6: Consider a Break from Nail Polish
While it may be tempting to cover up damaged nails with nail polish, it’s best to give them a break to allow them to heal. Nail polish can trap moisture and chemicals against the nail surface, which can worsen the damage. If you do choose to wear nail polish, use a non-acetone remover to minimize damage.
Step 7: Consult a Professional
If your nail damage is severe or doesn’t improve with home treatment, consult a dermatologist or nail technician. They can assess the condition of your nails and recommend professional treatments, such as:
* **Prescription-Strength Nail Strengtheners:** These products contain higher concentrations of active ingredients and can be more effective for severe damage.
* **Laser Therapy:** Laser therapy can help to stimulate nail growth and improve nail health.
* **Nail Reconstruction:** In extreme cases, nail reconstruction may be necessary to restore the appearance and function of the nail.
Preventing Future Damage: Expert Tips
Prevention is always better than cure. By following these expert tips, you can minimize the risk of damaged nails after acrylics.
Choose a Reputable Nail Salon
Select a nail salon that is clean, well-maintained, and staffed by experienced technicians. Ask about their sterilization practices and ensure they use high-quality products.
Proper Application Techniques
Ensure your nail technician uses proper application techniques, including:
* **Gentle Filing:** Avoid excessive filing of the natural nail.
* **Proper Dehydration:** Use a dehydrator sparingly to avoid over-drying the nails.
* **Precise Adhesive Application:** Apply the adhesive carefully to avoid contact with the skin.
Safe Removal Practices
The most important thing you can do to prevent nail damage is to have your acrylics removed professionally. A skilled technician will use the following safe removal practices:
* **Soaking in Acetone:** The acrylics are soaked in acetone to dissolve the adhesive.
* **Gentle Removal:** The softened acrylics are gently removed with a cuticle pusher or orange stick.
* **Avoid Forcible Removal:** Never peel or pick off acrylics, as this can cause significant damage.
Limit Acrylic Use
While acrylic nails can be a fun and stylish way to enhance your appearance, it’s best to limit their use to special occasions. Prolonged use of acrylics can weaken the nails and increase the risk of damage.
Maintain Healthy Habits
Healthy habits can help to promote strong and healthy nails:
* **Balanced Diet:** Eat a balanced diet rich in vitamins and minerals, particularly biotin, vitamin E, and zinc.
* **Hydration:** Drink plenty of water to keep your nails hydrated from the inside out.
* **Avoid Harsh Chemicals:** Protect your nails from harsh chemicals and solvents.
Product Recommendations for Nail Repair
Several products can help repair and strengthen damaged nails after acrylics. Here are a few recommendations:
* **OPI Nail Envy Original Formula:** A classic nail strengthener that contains hydrolyzed protein and calcium to help harden and protect the nails.
* **CND RescueRXx Daily Keratin Treatment:** A keratin-based treatment that helps to repair and strengthen damaged nails.
* **Essie Treat Love & Color Nail Polish:** A nail polish that contains optical brighteners and camellia extract to help improve the appearance of damaged nails.
* **Cuccio Revitalize Cuticle Oil:** A nourishing cuticle oil that contains sunflower and safflower oils to help hydrate and condition the nails and cuticles.
These products are generally available at drugstores, beauty supply stores, and online retailers. Always follow the product instructions carefully.
The Role of Biotin and Other Supplements
Biotin, a B-vitamin, is often touted as a nail-strengthening supplement. While some studies suggest that biotin can improve nail thickness and reduce brittleness, more research is needed. Other supplements that may benefit nail health include:
* **Vitamin E:** A powerful antioxidant that helps protect the nails from damage.
* **Zinc:** An essential mineral that helps to promote nail growth and strength.
* **Collagen:** A protein that helps to improve nail strength and elasticity.
Before taking any supplements, consult with your doctor to ensure they are safe for you and won’t interact with any medications you are taking.
Acrylic Nail Alternatives: Exploring Healthier Options
If you’re concerned about the potential damage from acrylic nails, consider exploring some healthier alternatives:
* **Gel Polish:** Gel polish is a long-lasting nail polish that is cured under a UV or LED lamp. It is less damaging to the natural nails than acrylics.
* **Dip Powder Nails:** Dip powder nails involve dipping the nails into a colored powder, which is then sealed with a top coat. They are generally less damaging than acrylics and gel polish.
* **Press-On Nails:** Press-on nails are a temporary option that can be easily applied and removed. They are a good choice for special occasions.
These alternatives can provide a similar look to acrylics without the same level of damage. Talk to your nail technician about which option is best for you.
The Importance of Professional Nail Care
Professional nail care is essential for maintaining healthy nails. A skilled nail technician can provide expert advice and treatments to help repair and prevent nail damage. Regular manicures and pedicures can help to keep your nails trimmed, shaped, and hydrated. A professional can also identify and treat nail problems early on, preventing them from becoming more serious.
Damaged Nails After Acrylics: A Q&A
Here are some frequently asked questions about damaged nails after acrylics:
### Q1: How long does it take for damaged nails to recover after acrylics?
*A: Recovery time varies depending on the severity of the damage. It can take anywhere from a few weeks to several months for nails to fully recover.*
### Q2: Can I use nail polish on damaged nails?
*A: It’s best to give your nails a break from nail polish to allow them to heal. If you do use nail polish, choose a non-acetone remover.*
### Q3: Are there any home remedies for repairing damaged nails?
*A: Yes, soaking your nails in olive oil or applying vitamin E oil can help to hydrate and nourish them.*
### Q4: Can I still get acrylic nails if I have damaged nails?
*A: It’s best to wait until your nails have fully recovered before getting acrylics again. In the meantime, consider healthier alternatives like gel polish or dip powder nails.*
### Q5: How can I prevent my nails from getting damaged after acrylics?
*A: Choose a reputable nail salon, have your acrylics removed professionally, and limit their use.*
### Q6: What ingredients should I look for in a nail strengthener?
*A: Look for products containing keratin, calcium, and nylon fibers.*
### Q7: Can a nail infection develop from damaged nails?
*A: Yes, damage to the nail plate can create openings for bacteria and fungi, increasing the risk of nail infections.*
### Q8: Are gel nails better for my nails than acrylics?
*A: Gel nails are generally considered less damaging than acrylics because they require less filing of the natural nail.*
### Q9: Is it normal for my nails to be sensitive after removing acrylics?
*A: Yes, it’s normal for nails to be sensitive after removing acrylics due to the thinning of the nail plate.*
### Q10: How often should I moisturize my nails?
*A: Moisturize your nails several times a day, especially after washing your hands.*
Conclusion: Reclaiming Your Nail Health
Damaged nails after acrylics are a common concern, but with the right care and prevention strategies, you can restore your nails to their natural health and beauty. Remember to focus on hydration, strengthening, and protection. By following the tips and recommendations in this guide, you can enjoy the benefits of beautiful nails without compromising their health. Share your experiences with damaged nails after acrylics in the comments below and let’s help each other reclaim our nail health!
