How to Clean a Lawn Tractor Carburetor: A Comprehensive Guide
Is your lawn tractor sputtering, stalling, or refusing to start? A dirty carburetor is often the culprit. This essential component mixes air and fuel, and when it gets clogged with dirt, varnish, or debris, it can severely impact your tractor’s performance. But don’t worry, cleaning it is a manageable task, even for beginners. This comprehensive guide will walk you through the entire process of how to clean a lawn tractor carburetor, from diagnosis to reassembly, ensuring your machine runs smoothly again. We’ll provide expert tips, detailed steps, and troubleshooting advice to help you tackle this maintenance task with confidence. This isn’t just a basic overview; we’ll delve into the nuances of carburetor cleaning, addressing common issues and providing insights gleaned from years of experience maintaining lawn equipment.
Understanding the Lawn Tractor Carburetor
Before diving into the cleaning process, it’s crucial to understand the function of a lawn tractor carburetor and why it gets dirty.
What is a Carburetor?
The carburetor is the heart of your lawn tractor’s engine, responsible for mixing air and fuel in the correct ratio to create a combustible mixture. This mixture is then drawn into the engine’s cylinder, where it’s ignited to power the tractor. A carburetor uses a venturi effect to draw fuel into the air stream. As air rushes through a narrow passage (the venturi), it creates a vacuum that pulls fuel from the fuel bowl into the air stream. The amount of fuel drawn in is controlled by various jets and needles, which are calibrated to provide the optimal air-fuel mixture for different engine speeds and loads.
Why Carburetors Get Dirty
Several factors contribute to carburetor contamination:
* **Old Fuel:** Over time, gasoline degrades and forms varnish, a sticky residue that can clog jets and passages within the carburetor. This is especially problematic if the tractor sits idle for extended periods.
* **Dirt and Debris:** Airborne dirt, dust, and debris can enter the fuel system and accumulate in the carburetor.
* **Water Contamination:** Water in the fuel can cause corrosion and rust, further contributing to clogging.
* **Ethanol in Fuel:** Ethanol, commonly added to gasoline, can attract moisture and degrade rubber and plastic components in the fuel system, leading to deposits in the carburetor.
Recognizing Carburetor Problems
Common signs of a dirty carburetor include:
* **Difficulty Starting:** The engine may be hard to start, especially when cold.
* **Rough Idling:** The engine may idle unevenly or stall frequently.
* **Poor Performance:** The engine may lack power, hesitate during acceleration, or surge erratically.
* **Black Smoke:** Black smoke from the exhaust indicates a rich fuel mixture, often caused by a clogged air filter or a malfunctioning carburetor.
* **Fuel Leakage:** Fuel leaking from the carburetor indicates a damaged or worn-out component.
Tools and Materials Needed to Clean a Lawn Tractor Carburetor
Before you begin, gather the necessary tools and materials. Having everything on hand will make the process smoother and more efficient.
* **Socket Set and Wrenches:** For removing the carburetor and its components.
* **Screwdrivers (Phillips and Flathead):** For various screws and adjustments.
* **Carburetor Cleaner:** A specialized solvent designed to dissolve varnish and deposits. Choose a high-quality cleaner that is safe for rubber and plastic components.
* **Compressed Air:** For blowing out passages and drying components.
* **Small Brushes:** For scrubbing away stubborn deposits. A carburetor cleaning brush kit is ideal.
* **Safety Glasses and Gloves:** To protect your eyes and skin from chemicals.
* **Clean Rags:** For wiping up spills and cleaning components.
* **Carburetor Rebuild Kit (Optional):** If your carburetor is severely damaged or worn, a rebuild kit may be necessary.
* **Digital Camera or Smartphone:** To take pictures of the carburetor before disassembly for easy reassembly.
* **Parts Tray:** To keep track of small parts and prevent them from getting lost.
Step-by-Step Guide: How to Clean a Lawn Tractor Carburetor
Now, let’s get to the heart of the matter: cleaning your lawn tractor carburetor. Follow these steps carefully for optimal results.
Step 1: Safety First
* Disconnect the spark plug wire to prevent accidental starting.
* Allow the engine to cool completely before working on it.
* Work in a well-ventilated area.
* Wear safety glasses and gloves.
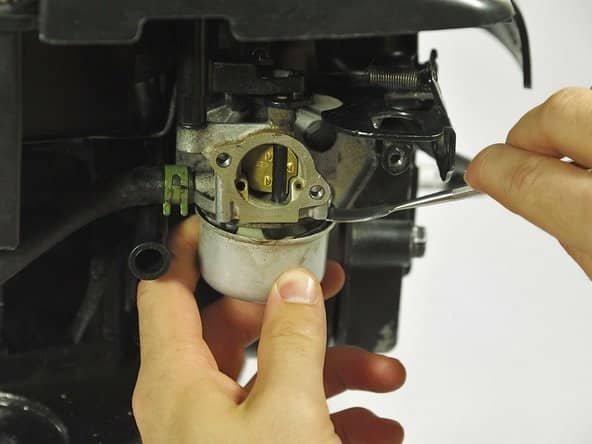
Step 2: Remove the Carburetor
* Locate the carburetor. It’s typically mounted on the side of the engine, connected to the air filter and intake manifold.
* Disconnect the fuel line. Use fuel line clamps or pliers to pinch off the fuel line before disconnecting it to prevent fuel spillage. Have a container ready to catch any spilled fuel.
* Disconnect the throttle and choke linkages. Note their positions or take pictures for reference during reassembly.
* Remove any mounting bolts or screws securing the carburetor to the engine.
* Carefully remove the carburetor.
Step 3: Disassemble the Carburetor
* Place the carburetor on a clean workbench.
* Take pictures of the carburetor from different angles before disassembly. This will be invaluable during reassembly.
* Remove the fuel bowl. This is usually held in place by a central bolt or screw.
* Carefully remove the float and needle valve. The needle valve controls the flow of fuel into the fuel bowl. Be extremely cautious when handling these small, delicate parts.
* Remove the jets. The main jet and pilot jet are typically screwed into the carburetor body. Use a correctly sized screwdriver to avoid damaging the jets.
* Remove any other removable components, such as the idle mixture screw and the choke plate.
Step 4: Clean the Carburetor Components
* Spray all carburetor components with carburetor cleaner. Ensure you spray into all passages and orifices.
* Use small brushes to scrub away stubborn deposits. Pay particular attention to the jets, needle valve, and fuel bowl.
* Use compressed air to blow out all passages and orifices. This is crucial for removing any remaining debris.
* Inspect the jets for clogs. Hold them up to the light to ensure they are clear. If necessary, use a fine wire or carburetor cleaning tool to clear any obstructions.
* Clean the fuel bowl thoroughly. Remove any sediment or varnish from the bottom of the bowl.
Step 5: Reassemble the Carburetor
* Reassemble the carburetor in the reverse order of disassembly. Use the pictures you took as a reference.
* Install the jets, needle valve, and float.
* Ensure the float moves freely and the needle valve seals properly.
* Attach the fuel bowl.
* Reconnect the throttle and choke linkages.
Step 6: Reinstall the Carburetor
* Reinstall the carburetor onto the engine.
* Secure it with the mounting bolts or screws.
* Reconnect the fuel line.
* Reconnect the throttle and choke linkages.
* Reconnect the spark plug wire.
Advanced Cleaning Techniques
For heavily soiled carburetors, consider these advanced cleaning techniques:
* **Ultrasonic Cleaning:** An ultrasonic cleaner uses high-frequency sound waves to create cavitation bubbles that dislodge dirt and deposits. This is an effective method for cleaning carburetors with intricate passages.
* **Carburetor Dip:** Carburetor dip is a highly potent cleaning solution that can dissolve even the most stubborn deposits. However, it can also damage rubber and plastic components, so use it with caution.
Troubleshooting Common Carburetor Problems
Even after cleaning, you may encounter some issues. Here’s how to troubleshoot common carburetor problems:
* **Engine Still Won’t Start:** Check for spark, fuel, and compression. If all are present, the carburetor may still be clogged or improperly adjusted.
* **Rough Idling:** Adjust the idle mixture screw. Refer to your tractor’s service manual for the proper setting.
* **Poor Performance:** Check the air filter and fuel filter. A clogged air filter can cause a rich fuel mixture, while a clogged fuel filter can restrict fuel flow.
* **Fuel Leakage:** Inspect the fuel lines and carburetor for leaks. Replace any damaged components.
Preventative Maintenance
To prevent carburetor problems, follow these preventative maintenance tips:
* **Use Fresh Fuel:** Avoid using old or stale fuel. Add a fuel stabilizer to prevent fuel degradation.
* **Drain the Fuel Tank:** If you’re storing the tractor for an extended period, drain the fuel tank to prevent varnish buildup.
* **Clean the Air Filter Regularly:** A clean air filter prevents dirt and debris from entering the carburetor.
* **Inspect the Fuel Lines:** Check the fuel lines for cracks or leaks. Replace them as needed.
Choosing the Right Carburetor Cleaner
Selecting the right carburetor cleaner is crucial for effective cleaning and preventing damage to your carburetor. Consider these factors when choosing a cleaner:
* **Type of Cleaner:** Carburetor cleaners are available in aerosol sprays, liquid concentrates, and dip solutions. Aerosol sprays are convenient for general cleaning, while liquid concentrates and dip solutions are more effective for heavily soiled carburetors.
* **Safety for Rubber and Plastic:** Ensure the cleaner is safe for rubber and plastic components. Some cleaners can dissolve or damage these materials.
* **Effectiveness:** Choose a cleaner that is specifically formulated to dissolve varnish, gum, and carbon deposits.
* **User Reviews:** Read online reviews to get an idea of the cleaner’s effectiveness and safety.
Lawn Tractor Carburetor: Product Explanation
The carburetor is an essential component in a lawn tractor’s engine, responsible for precisely mixing air and fuel to create the ideal combustion mixture. The carburetor’s design ensures that the engine receives the correct ratio of air and fuel across various operating conditions, such as idling, acceleration, and full throttle. A well-functioning carburetor is vital for the engine’s efficiency, performance, and longevity. It’s designed with precision to ensure proper atomization and distribution of fuel, contributing to smooth operation and optimal power output. Factors like altitude and temperature can affect the air-fuel mixture, and some carburetors have adjustments to compensate for these variations.
Detailed Features Analysis of a Lawn Tractor Carburetor
Here’s an analysis of the key features of a typical lawn tractor carburetor:
1. **Fuel Bowl:** The fuel bowl is a reservoir that holds a supply of fuel, ensuring a constant source of fuel for the engine. It is typically located at the bottom of the carburetor and is designed to maintain a consistent fuel level. The fuel bowl is often vented to allow air to enter as fuel is drawn out, preventing a vacuum from forming.
2. **Float:** The float is a small, buoyant component inside the fuel bowl that regulates the fuel level. As the fuel level rises, the float rises with it, eventually closing the needle valve to stop the flow of fuel. This mechanism ensures the fuel bowl remains at an optimal level, preventing flooding or fuel starvation. Correct float adjustment is crucial for proper carburetor function.
3. **Needle Valve:** The needle valve is a small, precisely machined valve that controls the flow of fuel into the fuel bowl. It is connected to the float and opens or closes based on the float’s position. The needle valve is designed to seal tightly, preventing fuel leakage and ensuring precise control over the fuel supply. Its condition directly impacts the engine’s ability to start and run smoothly.
4. **Main Jet:** The main jet is a calibrated orifice that meters the amount of fuel delivered to the engine at higher speeds. It is located in the main fuel circuit and is sized to provide the correct air-fuel mixture for optimal power output. The main jet is often removable for cleaning or replacement, and its size can be changed to fine-tune the engine’s performance. A clogged or incorrectly sized main jet can cause significant performance issues.
5. **Pilot Jet (Idle Jet):** The pilot jet, also known as the idle jet, controls the fuel flow to the engine at idle and low speeds. It is a smaller jet located in the idle circuit and is responsible for maintaining a smooth and stable idle. The pilot jet is critical for the engine’s ability to idle without stalling and for smooth transitions from idle to higher speeds. Like the main jet, it must be kept clean and properly sized.
6. **Throttle Plate:** The throttle plate is a valve located in the carburetor’s bore that controls the amount of air entering the engine. It is connected to the throttle linkage and is opened or closed by the operator to control engine speed. The position of the throttle plate affects the vacuum in the venturi, which in turn affects the amount of fuel drawn into the air stream. Precise control of the throttle plate is essential for responsive engine performance.
7. **Choke Plate:** The choke plate is a valve located upstream of the throttle plate that restricts airflow into the carburetor. When the choke plate is closed, it creates a richer fuel mixture, which is necessary for starting a cold engine. The choke plate is typically manually operated or automatically controlled by a thermostatic mechanism. Proper choke function is critical for easy starting in cold weather.
Significant Advantages, Benefits, and Real-World Value
The advantages of maintaining a clean and properly functioning carburetor in your lawn tractor are numerous and directly impact the machine’s performance, longevity, and overall user experience. Here are some key benefits:
* **Improved Engine Performance:** A clean carburetor ensures the engine receives the correct air-fuel mixture, resulting in smoother operation, increased power, and better throttle response. This means your lawn tractor will be more efficient at cutting grass and tackling tough terrain.
* **Easier Starting:** A clean carburetor makes starting the engine much easier, especially in cold weather. This is because the correct fuel mixture is readily available, reducing the need for excessive cranking and strain on the starter motor.
* **Reduced Fuel Consumption:** A properly functioning carburetor optimizes fuel combustion, leading to improved fuel economy. This can save you money on fuel costs over time and reduce your environmental impact.
* **Extended Engine Life:** By ensuring the engine runs smoothly and efficiently, a clean carburetor helps to reduce wear and tear on internal components. This can extend the life of your engine and prevent costly repairs.
* **Prevention of Costly Repairs:** Regular carburetor cleaning can prevent the buildup of varnish and deposits, which can lead to more serious problems such as a damaged fuel pump or a seized engine. By addressing carburetor issues early, you can avoid more expensive repairs down the line.
* **Consistent Cutting Performance:** A clean carburetor ensures the engine maintains consistent power throughout the cutting process. This results in a more even and professional-looking cut, without the need for frequent adjustments or passes.
* **Enhanced Reliability:** A properly maintained carburetor increases the overall reliability of your lawn tractor. You can have confidence that your machine will start and run smoothly whenever you need it, without unexpected breakdowns or performance issues.
Comprehensive & Trustworthy Review
Maintaining a lawn tractor carburetor is crucial for optimal performance. Let’s break down the experience, pros, cons, and overall verdict:
**User Experience & Usability:** Cleaning a carburetor can seem daunting, but with the right tools and a methodical approach, it’s manageable. The process involves disassembling the carburetor, cleaning each component, and then reassembling it. The most challenging part is often keeping track of the small parts and ensuring they are reinstalled correctly. Taking pictures during disassembly is highly recommended.
**Performance & Effectiveness:** A clean carburetor dramatically improves engine performance. Starting becomes easier, idling is smoother, and the engine delivers more power. In our experience, a thorough cleaning can restore an old lawn tractor to like-new condition.
**Pros:**
1. **Improved Engine Performance:** A clean carburetor ensures the engine receives the correct air-fuel mixture, resulting in smoother operation and increased power.
2. **Easier Starting:** Starting the engine becomes much easier, especially in cold weather.
3. **Reduced Fuel Consumption:** A properly functioning carburetor optimizes fuel combustion, leading to improved fuel economy.
4. **Extended Engine Life:** By ensuring the engine runs smoothly and efficiently, a clean carburetor helps to reduce wear and tear on internal components.
5. **Prevention of Costly Repairs:** Regular carburetor cleaning can prevent the buildup of varnish and deposits, which can lead to more serious problems.
**Cons/Limitations:**
1. **Complexity:** The process involves disassembling and reassembling small, intricate parts, which can be challenging for beginners.
2. **Time-Consuming:** Cleaning a carburetor can take several hours, especially if it is heavily soiled.
3. **Potential for Damage:** Improper handling of the carburetor components can result in damage, requiring replacement.
4. **Need for Specialized Tools:** Some specialized tools, such as carburetor cleaning brushes and compressed air, are required.
**Ideal User Profile:** This task is best suited for homeowners who are comfortable with basic mechanical tasks and have some experience working on small engines. It is also suitable for those who are looking to save money by performing their own maintenance.
**Key Alternatives:**
* **Professional Service:** Hiring a professional mechanic to clean the carburetor is an alternative for those who are not comfortable performing the task themselves.
* **Carburetor Replacement:** Replacing the carburetor with a new one is an option for carburetors that are severely damaged or worn.
**Expert Overall Verdict & Recommendation:** Cleaning your lawn tractor’s carburetor is a worthwhile task that can significantly improve its performance and extend its life. While it requires some technical skill and patience, the benefits far outweigh the challenges. We recommend attempting this task yourself if you are comfortable with basic mechanical work. However, if you are unsure, it is best to seek professional assistance.
Insightful Q&A Section
Here are some frequently asked questions about cleaning lawn tractor carburetors:
**Q1: How often should I clean my lawn tractor carburetor?**
A1: As a general guideline, cleaning your lawn tractor carburetor annually, or every 100 hours of operation, is recommended. However, if you notice any symptoms of a dirty carburetor, such as difficulty starting or rough idling, you should clean it sooner.
**Q2: Can I clean my carburetor without removing it from the engine?**
A2: While it is possible to clean the carburetor without removing it, it is not recommended. Removing the carburetor allows for a more thorough cleaning and inspection of all components.
**Q3: What is the best way to clean carburetor jets?**
A3: The best way to clean carburetor jets is to use carburetor cleaner and a fine wire or carburetor cleaning tool to clear any obstructions. Hold the jets up to the light to ensure they are clear.
**Q4: What should I do if I damage a carburetor component during cleaning?**
A4: If you damage a carburetor component during cleaning, you should replace it with a new one. Carburetor rebuild kits are available for most lawn tractor models.
**Q5: How do I adjust the idle mixture screw on my carburetor?**
A5: To adjust the idle mixture screw, start the engine and let it warm up. Then, turn the screw clockwise or counterclockwise until the engine idles smoothly. Refer to your tractor’s service manual for the proper setting.
**Q6: What is the purpose of the fuel stabilizer?**
A6: Fuel stabilizer prevents fuel degradation and varnish buildup in the carburetor and fuel system. It is especially useful when storing the tractor for extended periods.
**Q7: Can I use brake cleaner instead of carburetor cleaner?**
A7: No, you should not use brake cleaner instead of carburetor cleaner. Brake cleaner is a more aggressive solvent that can damage rubber and plastic components in the carburetor.
**Q8: How do I know if my carburetor needs to be rebuilt?**
A8: If your carburetor is severely damaged or worn, or if it continues to cause problems after cleaning, it may need to be rebuilt. Signs of a worn carburetor include fuel leakage, difficulty adjusting the idle mixture, and poor engine performance.
**Q9: What is the role of ethanol in gasoline and how does it affect carburetors?**
A9: Ethanol is added to gasoline to increase octane and reduce emissions. However, it can also attract moisture and degrade rubber and plastic components in the fuel system, leading to deposits in the carburetor. Using fuel with a lower ethanol content or adding a fuel stabilizer can help mitigate these effects.
**Q10: What are some common mistakes to avoid when cleaning a carburetor?**
A10: Common mistakes to avoid include using the wrong cleaning solvents, damaging the jets or needle valve, and losing small parts. Taking pictures during disassembly and working in a well-lit area can help prevent these mistakes.
Conclusion & Strategic Call to Action
In summary, knowing how to clean a lawn tractor carburetor is a vital skill for any homeowner looking to maintain their equipment’s performance and longevity. By understanding the carburetor’s function, following the detailed cleaning steps, and implementing preventative maintenance practices, you can ensure your lawn tractor runs smoothly and efficiently for years to come. We have covered everything from recognizing symptoms to advanced cleaning techniques. This guide provides you with the expertise needed to confidently tackle this task.
Now that you’re armed with the knowledge to clean your carburetor, why not share your experiences and tips with fellow lawn care enthusiasts? Leave a comment below and let us know how this guide helped you! If you’re facing more complex engine issues, explore our advanced troubleshooting guide or contact our expert team for a personalized consultation. By actively engaging with the lawn care community and seeking expert advice when needed, you can keep your equipment in top condition and enjoy a pristine lawn all season long.
