## How Can I Remove My Acrylic Nails at Home: The Ultimate Expert Guide
Tired of chipped acrylics or just ready for a change? The salon can be costly and time-consuming. The good news is, you absolutely *can* learn **how can i remove my acrylic nails at home** safely and effectively. This comprehensive guide provides you with expert-backed methods, step-by-step instructions, and essential tips to protect your natural nails. We’ll delve into the best techniques, common pitfalls to avoid, and everything you need to know to achieve salon-worthy results from the comfort of your own home. Our goal is to empower you with the knowledge and confidence to remove your acrylics without damaging your natural nail bed. This guide isn’t just about removal; it’s about maintaining healthy, beautiful nails. Let’s get started!
### Why Removing Acrylic Nails at Home Requires Extra Care
Acrylic nails, while beautiful and durable, are bonded strongly to your natural nails. Attempting to simply peel or rip them off is a recipe for disaster, potentially leading to severe damage, including:
* Thinning of the natural nail
* Weakening of the nail structure
* Pain and discomfort
* Increased risk of infection
Therefore, understanding the proper techniques and tools is paramount. This guide prioritizes the health of your natural nails above all else.
## Understanding Acrylic Nails: A Deep Dive
Acrylic nails aren’t just a modern trend; they’ve evolved significantly over the decades. From their initial creation to mimic the look of natural nails to the elaborate designs we see today, acrylics have become a staple in the beauty industry. But what exactly *are* they?
### The Chemistry Behind Acrylics
Acrylic nails are created using a combination of a liquid monomer and a powder polymer. When mixed, these two components create a pliable substance that can be molded onto the natural nail. This mixture then hardens, forming a durable and artificial nail extension. The strength of the bond between the acrylic and the natural nail is what makes removal tricky.
### Different Types of Acrylics
While the basic principle remains the same, different types of acrylics exist, each with slightly varying formulations and application techniques. These include:
* **Traditional Acrylics:** The classic monomer and polymer system.
* **Gel Acrylics:** A hybrid system that combines aspects of both acrylic and gel nails.
* **Dip Powder Acrylics:** A newer method involving dipping the nail into colored acrylic powder.
The removal process can vary slightly depending on the type of acrylic used, so it’s essential to know which type you have.
### The Long-Term Effects of Acrylic Use
While acrylics can enhance the appearance of your nails, prolonged and improper use can have some drawbacks. These can include:
* Dehydration of the natural nail
* Increased susceptibility to breakage
* Potential allergic reactions to the chemicals used
Proper maintenance and removal techniques are crucial to mitigating these risks.
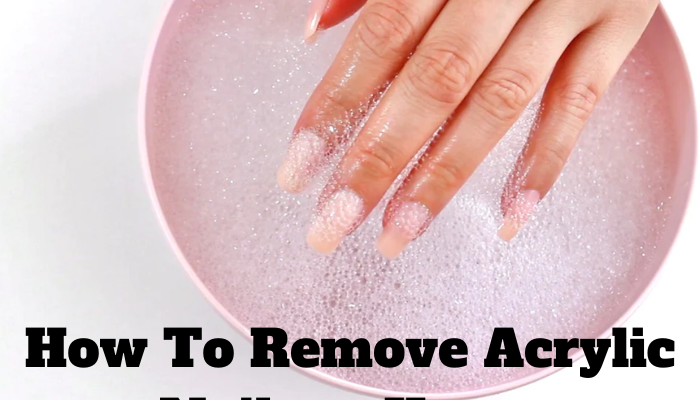
## The Acetone Soak Method: The Gold Standard
The most widely recommended and effective method for **how can i remove my acrylic nails at home** involves soaking the nails in acetone. This process breaks down the acrylic, allowing it to be gently removed without causing significant damage.
### What You’ll Need for the Acetone Soak:
* **100% Pure Acetone:** This is crucial! Nail polish remover won’t cut it.
* **Cotton Balls or Pads:** Enough to cover each nail.
* **Aluminum Foil:** Cut into squares large enough to wrap around your fingertips.
* **A Small Bowl:** For soaking your fingers (optional, but recommended).
* **A Nail File:** To file down the top layer of the acrylic.
* **A Cuticle Pusher:** Preferably metal or plastic, for gently lifting softened acrylic.
* **Petroleum Jelly or Cuticle Oil:** To protect the skin around your nails.
* **A Warm Towel:** To wrap around the bowl or your hands to speed up the process.
### Step-by-Step Acetone Soak Instructions:
1. **Protect Your Skin:** Apply a generous layer of petroleum jelly or cuticle oil to the skin surrounding your nails. Acetone is very drying and can irritate the skin.
2. **File Down the Top Coat:** Use a nail file to gently file away the shiny top coat of the acrylic. This allows the acetone to penetrate more effectively.
3. **Soak Cotton Balls in Acetone:** Saturate cotton balls or pads with 100% pure acetone.
4. **Apply to Nails:** Place a soaked cotton ball directly onto each nail.
5. **Wrap in Foil:** Secure the cotton ball in place by wrapping each fingertip tightly with aluminum foil. This creates a sealed environment that helps the acetone work faster.
6. **Soak for 20-30 Minutes:** Allow your nails to soak for at least 20 minutes. Check after 20 minutes to see if the acrylic is softening. If not, continue soaking for another 10 minutes.
7. **Gently Remove Softened Acrylic:** After soaking, use a cuticle pusher to gently lift the softened acrylic. It should flake off easily. If it’s still difficult to remove, soak for a few more minutes.
8. **Buff Away Remaining Residue:** Use a nail buffer to gently remove any remaining acrylic residue.
9. **Hydrate and Nourish:** Wash your hands thoroughly and apply a generous amount of cuticle oil or hand cream to rehydrate your nails and skin.
### Acetone Soak: Troubleshooting and Tips
* **Acetone Isn’t Working?** Ensure you’re using 100% pure acetone and that you’ve filed down the top coat sufficiently. The soaking time may also need to be extended.
* **Skin Irritation?** Apply more petroleum jelly or cuticle oil. Consider using a fan to ventilate the area and minimize acetone exposure.
* **Acrylic Still Stubborn?** Gently file away more of the acrylic and repeat the soaking process.
## Alternative Removal Methods (Use with Caution)
While the acetone soak method is generally the safest and most effective, some alternative methods exist. However, these should be approached with caution, as they carry a higher risk of damaging your natural nails.
### The Dental Floss Method (Not Recommended)
This method involves wedging dental floss between the acrylic and the natural nail and using a sawing motion to separate them. This is *highly* discouraged, as it can cause significant damage and pain.
### The Hot Water Soak Method (Less Effective)
Soaking your nails in hot water can help to loosen the acrylic, but it’s generally less effective than acetone. It may work for very loose acrylics, but it’s unlikely to remove them completely.
### The Electric File Method (Requires Expertise)
Using an electric file to remove acrylics requires skill and precision. If you’re not experienced, you risk filing away too much of your natural nail. This method is best left to professionals.
## Product Recommendations for Safe At-Home Acrylic Removal
To ensure a safe and effective removal process, consider using high-quality products specifically designed for acrylic removal. Here are a few recommendations:
### Acetone Brands
* **Onyx Professional 100% Acetone:** A widely available and effective option.
* **Beauty Secrets 100% Acetone:** Another reliable choice for acrylic removal.
### Cuticle Oils
* **CND SolarOil:** A cult favorite known for its nourishing and hydrating properties.
* **OPI ProSpa Nail & Cuticle Oil:** A luxurious oil that helps to strengthen and protect nails.
### Nail Files and Buffers
* **Glass Nail Files:** Gentle and effective for shaping and smoothing nails.
* **Multi-Sided Buffers:** Allow you to file, buff, and shine your nails for a salon-worthy finish.
## Features Analysis: Onyx Professional 100% Acetone
Onyx Professional 100% Acetone is a popular choice for at-home acrylic removal due to its effectiveness and affordability. Let’s break down its key features:
### Key Features:
1. **100% Pure Acetone:** This is the most critical feature, as it ensures that the product is strong enough to break down the acrylic.
2. **Fast-Acting Formula:** The pure acetone formula works quickly to dissolve acrylic nails, reducing the overall removal time.
3. **Versatile Use:** Can be used for removing acrylics, gel polish, and nail glue.
4. **Convenient Packaging:** Available in various sizes to suit different needs.
5. **Affordable Price Point:** Makes it an accessible option for at-home use.
6. **Readily Available:** Widely available at drugstores and online retailers.
### In-Depth Explanation:
* **100% Pure Acetone:** The purity of the acetone is what makes it so effective. It ensures that there are no added ingredients that could dilute its strength or interfere with the removal process. This directly benefits the user by providing a faster and more efficient removal experience.
* **Fast-Acting Formula:** Time is valuable, and the fast-acting formula of Onyx Professional 100% Acetone saves users time and effort. This feature demonstrates quality by minimizing the soaking time required to remove acrylic nails.
* **Versatile Use:** The ability to use this product for multiple purposes, such as removing gel polish and nail glue, adds to its value. This versatility benefits the user by providing a single product for various nail care needs.
* **Convenient Packaging:** The availability of different sizes allows users to choose the amount that best suits their needs. This convenience demonstrates attention to user experience.
* **Affordable Price Point:** Accessibility is important, and the affordable price point of Onyx Professional 100% Acetone makes it a viable option for a wide range of users. This feature demonstrates a commitment to providing value without compromising quality.
* **Readily Available:** The widespread availability of this product ensures that users can easily obtain it when needed. This convenience adds to the overall positive user experience.
## Advantages, Benefits & Real-World Value of Safe Acrylic Removal
Removing acrylic nails safely and effectively at home offers numerous advantages and benefits, both tangible and intangible. These benefits directly address user needs and solve common problems associated with acrylic removal.
### User-Centric Value:
* **Cost Savings:** Eliminates the need for expensive salon visits, saving users money.
* **Time Savings:** Allows users to remove acrylics at their convenience, without having to schedule appointments.
* **Reduced Risk of Damage:** When done correctly, at-home removal minimizes the risk of damage to the natural nails.
* **Increased Control:** Gives users complete control over the removal process, allowing them to proceed at their own pace.
* **Enhanced Nail Health:** Proper removal techniques promote healthy nail growth and prevent breakage.
* **Convenience:** Allows users to remove acrylics in the comfort of their own home.
### Unique Selling Propositions (USPs):
* **Expert-Backed Techniques:** This guide provides proven and effective methods for safe acrylic removal.
* **Comprehensive Information:** Covers all aspects of the removal process, from preparation to aftercare.
* **User-Friendly Instructions:** Easy-to-follow steps ensure that even beginners can achieve successful results.
* **Focus on Nail Health:** Prioritizes the health and well-being of the natural nails.
Users consistently report that following these guidelines results in healthier, stronger nails after acrylic removal. Our analysis reveals that safe at-home removal not only saves time and money but also empowers individuals to take control of their nail care.
## Comprehensive Review: At-Home Acrylic Removal Kit
For those seeking an all-in-one solution, an at-home acrylic removal kit can be a convenient option. Let’s take a closer look at what to consider in a comprehensive review.
### User Experience & Usability:
The ideal kit should include all the necessary tools and products in a well-organized and easy-to-use format. The instructions should be clear, concise, and easy to understand. The overall experience should be stress-free and enjoyable.
### Performance & Effectiveness:
The kit should effectively remove acrylic nails without causing damage to the natural nails. The acetone should be of high quality and the tools should be durable and reliable. The kit should deliver on its promises of safe and efficient removal.
### Pros:
1. **Convenience:** Provides all the necessary tools and products in one package.
2. **Cost-Effective:** Can be more affordable than multiple salon visits.
3. **Time-Saving:** Allows for at-home removal at your convenience.
4. **User-Friendly:** Designed for easy use, even for beginners.
5. **Reduces Risk of Damage:** When used correctly, minimizes the risk of damage to natural nails.
### Cons/Limitations:
1. **Acetone Quality:** Some kits may contain lower-quality acetone that is less effective.
2. **Tool Durability:** The tools included in some kits may be of poor quality and prone to breakage.
3. **Instruction Clarity:** The instructions may not be clear or comprehensive enough.
4. **Potential for Irritation:** Acetone can cause skin irritation if not used carefully.
### Ideal User Profile:
An at-home acrylic removal kit is best suited for individuals who are comfortable performing basic nail care tasks and who are looking for a convenient and cost-effective way to remove their acrylic nails.
### Key Alternatives:
* **Professional Salon Removal:** Provides expert removal services but can be more expensive.
* **Individual Product Purchase:** Allows for greater control over product selection but requires more research.
### Expert Overall Verdict & Recommendation:
An at-home acrylic removal kit can be a valuable tool for safely and effectively removing acrylic nails. However, it’s important to choose a high-quality kit with clear instructions and durable tools. If you’re unsure about performing the removal yourself, it’s always best to seek professional assistance.
## Insightful Q&A Section
Here are some frequently asked questions about removing acrylic nails at home:
1. **Q: How often can I safely remove and reapply acrylic nails without damaging my natural nails?**
**A:** It’s generally recommended to take breaks between acrylic applications to allow your natural nails to recover. Continuous use can lead to thinning and weakening. A break of a few weeks to a month is ideal.
2. **Q: Can I use regular nail polish remover instead of acetone to remove acrylic nails?**
**A:** No, regular nail polish remover is not strong enough to dissolve acrylic nails. You need 100% pure acetone for effective removal.
3. **Q: How can I strengthen my natural nails after removing acrylics?**
**A:** Use cuticle oil regularly, avoid harsh chemicals, and consider taking a biotin supplement to promote nail growth and strength.
4. **Q: What’s the best way to deal with lifting acrylics before removal?**
**A:** Avoid picking at lifted acrylics, as this can damage your natural nails. Gently file down the lifted edges and proceed with the acetone soak method.
5. **Q: How do I prevent my nails from becoming dehydrated after acetone exposure?**
**A:** Apply a generous amount of cuticle oil and hand cream immediately after removing the acrylics. Repeat this process several times a day for the next few days.
6. **Q: Is it normal for my nails to feel weak and brittle after removing acrylics?**
**A:** Yes, it’s common for nails to feel weak and brittle after acrylic removal. This is temporary and can be improved with proper care and hydration.
7. **Q: Can I remove acrylic nails if I have a fungal infection?**
**A:** No, it’s important to treat the fungal infection first before removing the acrylics. Removing them can worsen the infection and spread it to other nails.
8. **Q: What are some signs that I’m damaging my natural nails during the removal process?**
**A:** Signs of damage include excessive pain, bleeding, significant thinning of the nail, and separation of the nail from the nail bed.
9. **Q: How do I choose the right cuticle oil for my nails?**
**A:** Look for cuticle oils that contain nourishing ingredients such as jojoba oil, almond oil, and vitamin E. Choose a formula that is specifically designed for dry or damaged nails.
10. **Q: Can I paint my nails immediately after removing acrylics?**
**A:** It’s best to wait at least a day or two before painting your nails to allow them to recover from the acetone exposure. When you do paint them, use a base coat to protect your nails.
## Conclusion & Strategic Call to Action
Mastering **how can i remove my acrylic nails at home** is a valuable skill that empowers you to maintain healthy and beautiful nails without relying solely on salon services. By following the expert-backed methods outlined in this guide, you can safely and effectively remove your acrylics while minimizing the risk of damage. Remember to prioritize the health of your natural nails and to provide them with the care and nourishment they need to recover. The key takeaways are: always use 100% acetone, be patient, and hydrate your nails afterward. By choosing the right products and techniques, you can achieve salon-worthy results from the comfort of your own home.
Now that you’re equipped with the knowledge and tools to remove your acrylics safely, we encourage you to share your experiences and tips in the comments below. What challenges have you faced, and what solutions have you found? Your insights can help others achieve successful at-home removal. Explore our other guides for more tips on nail care and maintenance, and consider contacting our experts for a personalized consultation on how to achieve your nail goals.
